
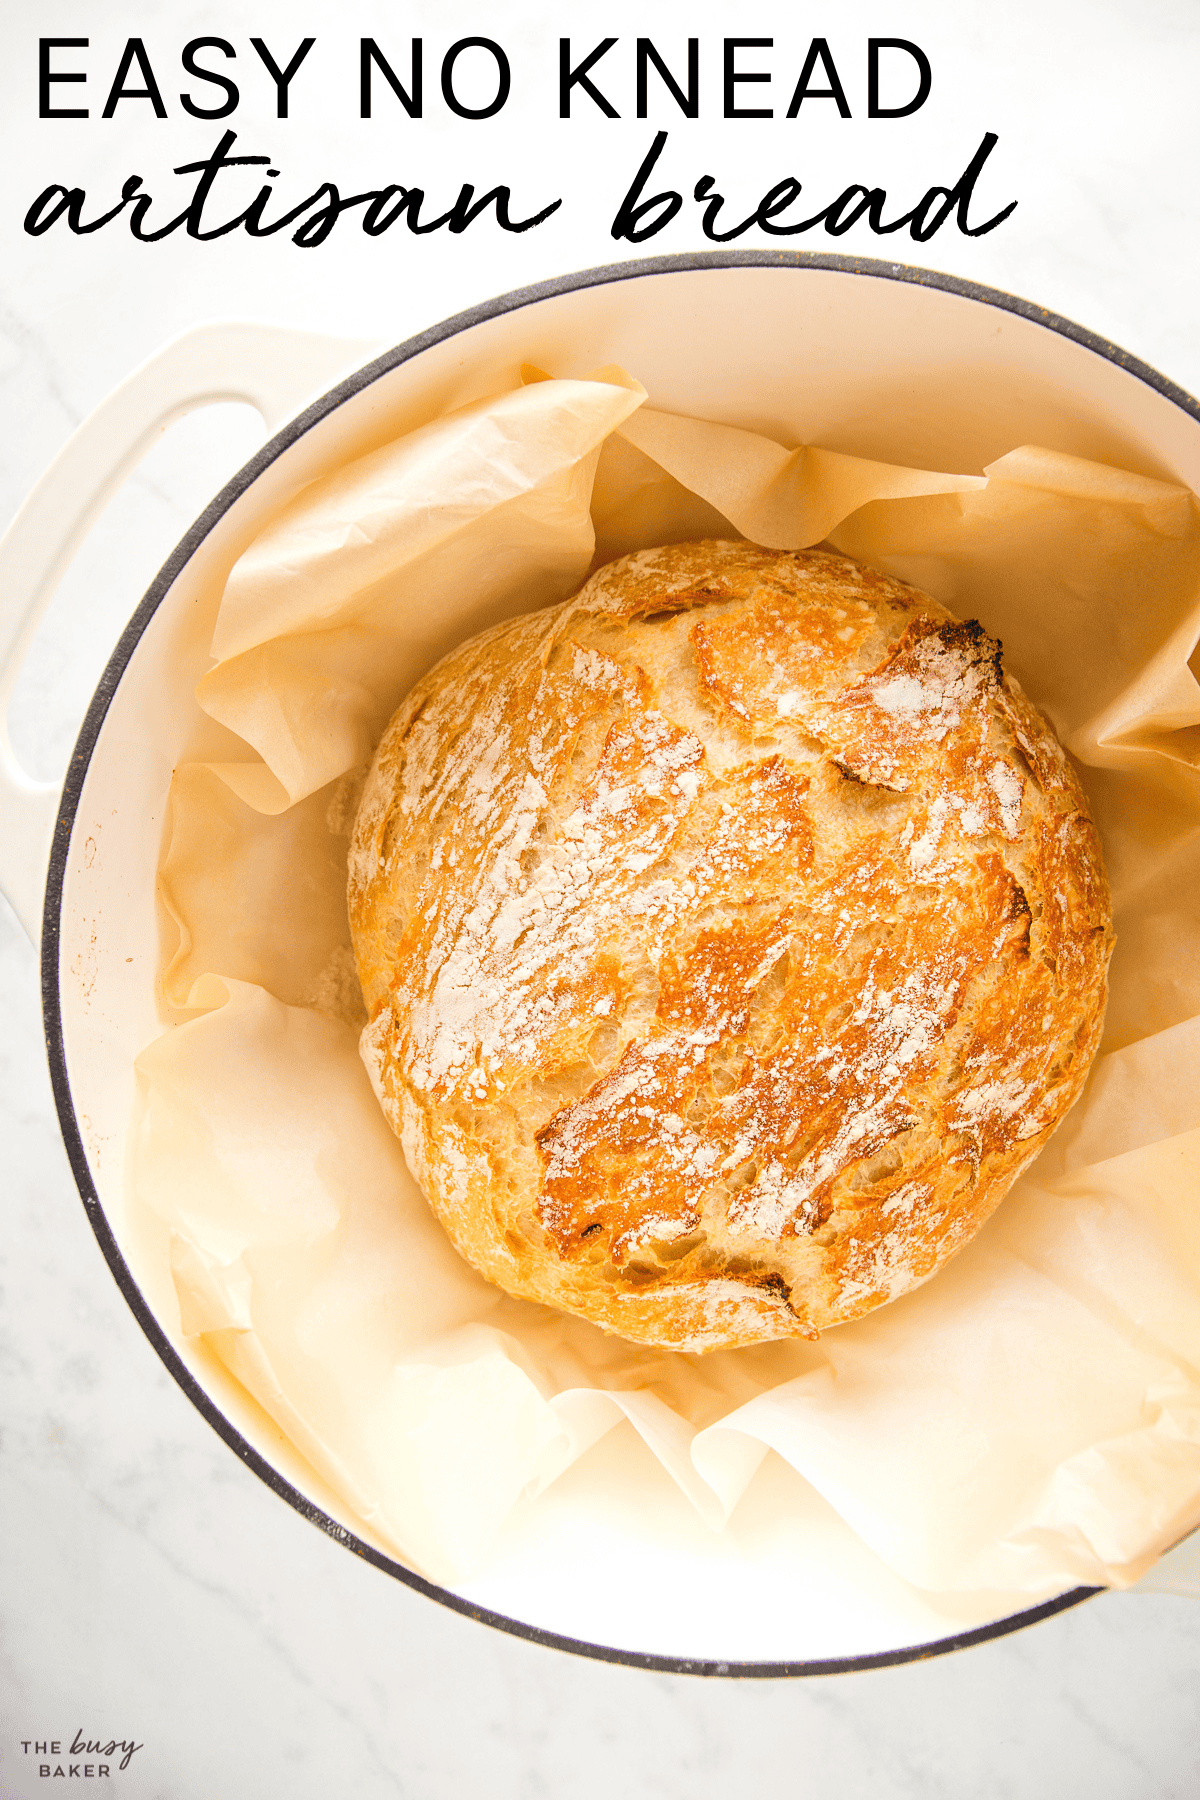
Artisan bread recipes don’t get easier than this No Knead Dutch Oven Bread recipe! Perfect for sandwiches, toasting, or enjoying with soup, chili, or stew!
Estimated reading time: 14 minutes
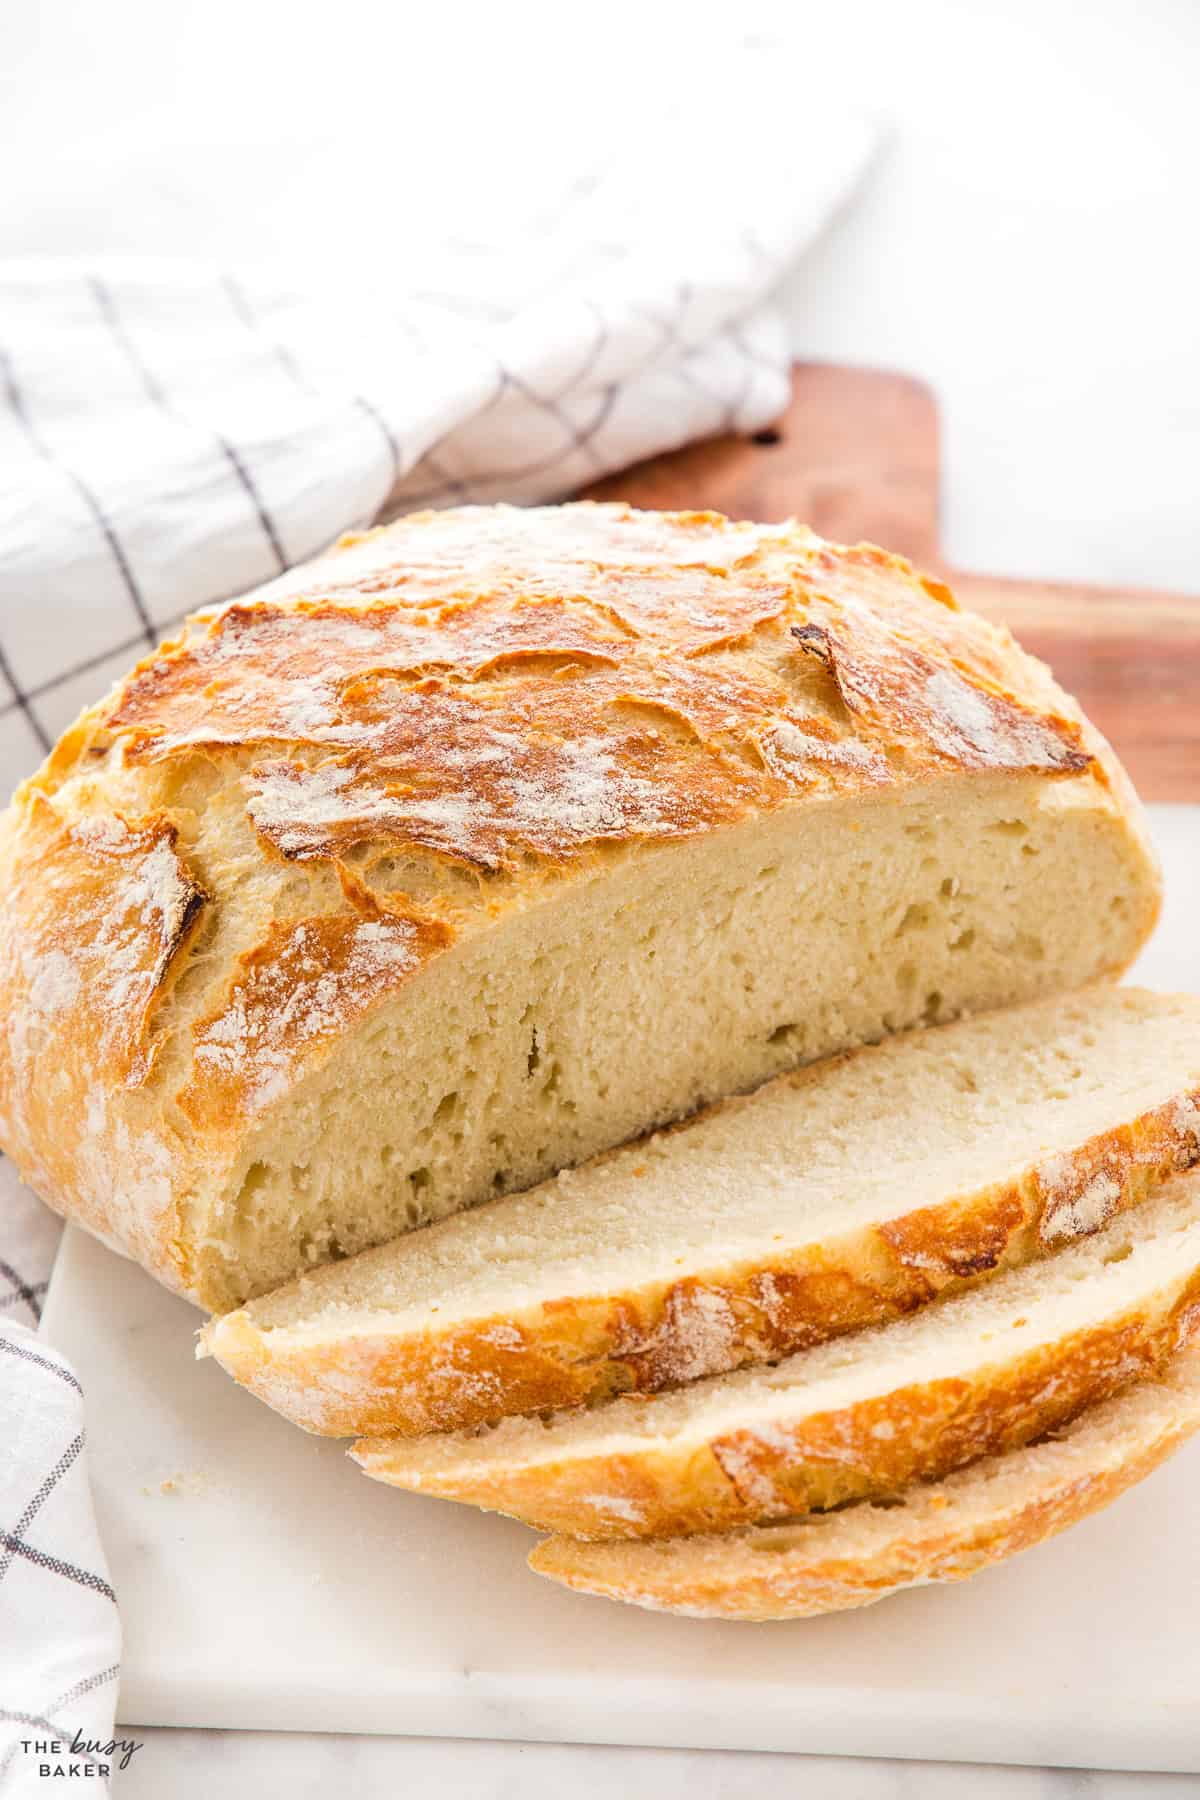
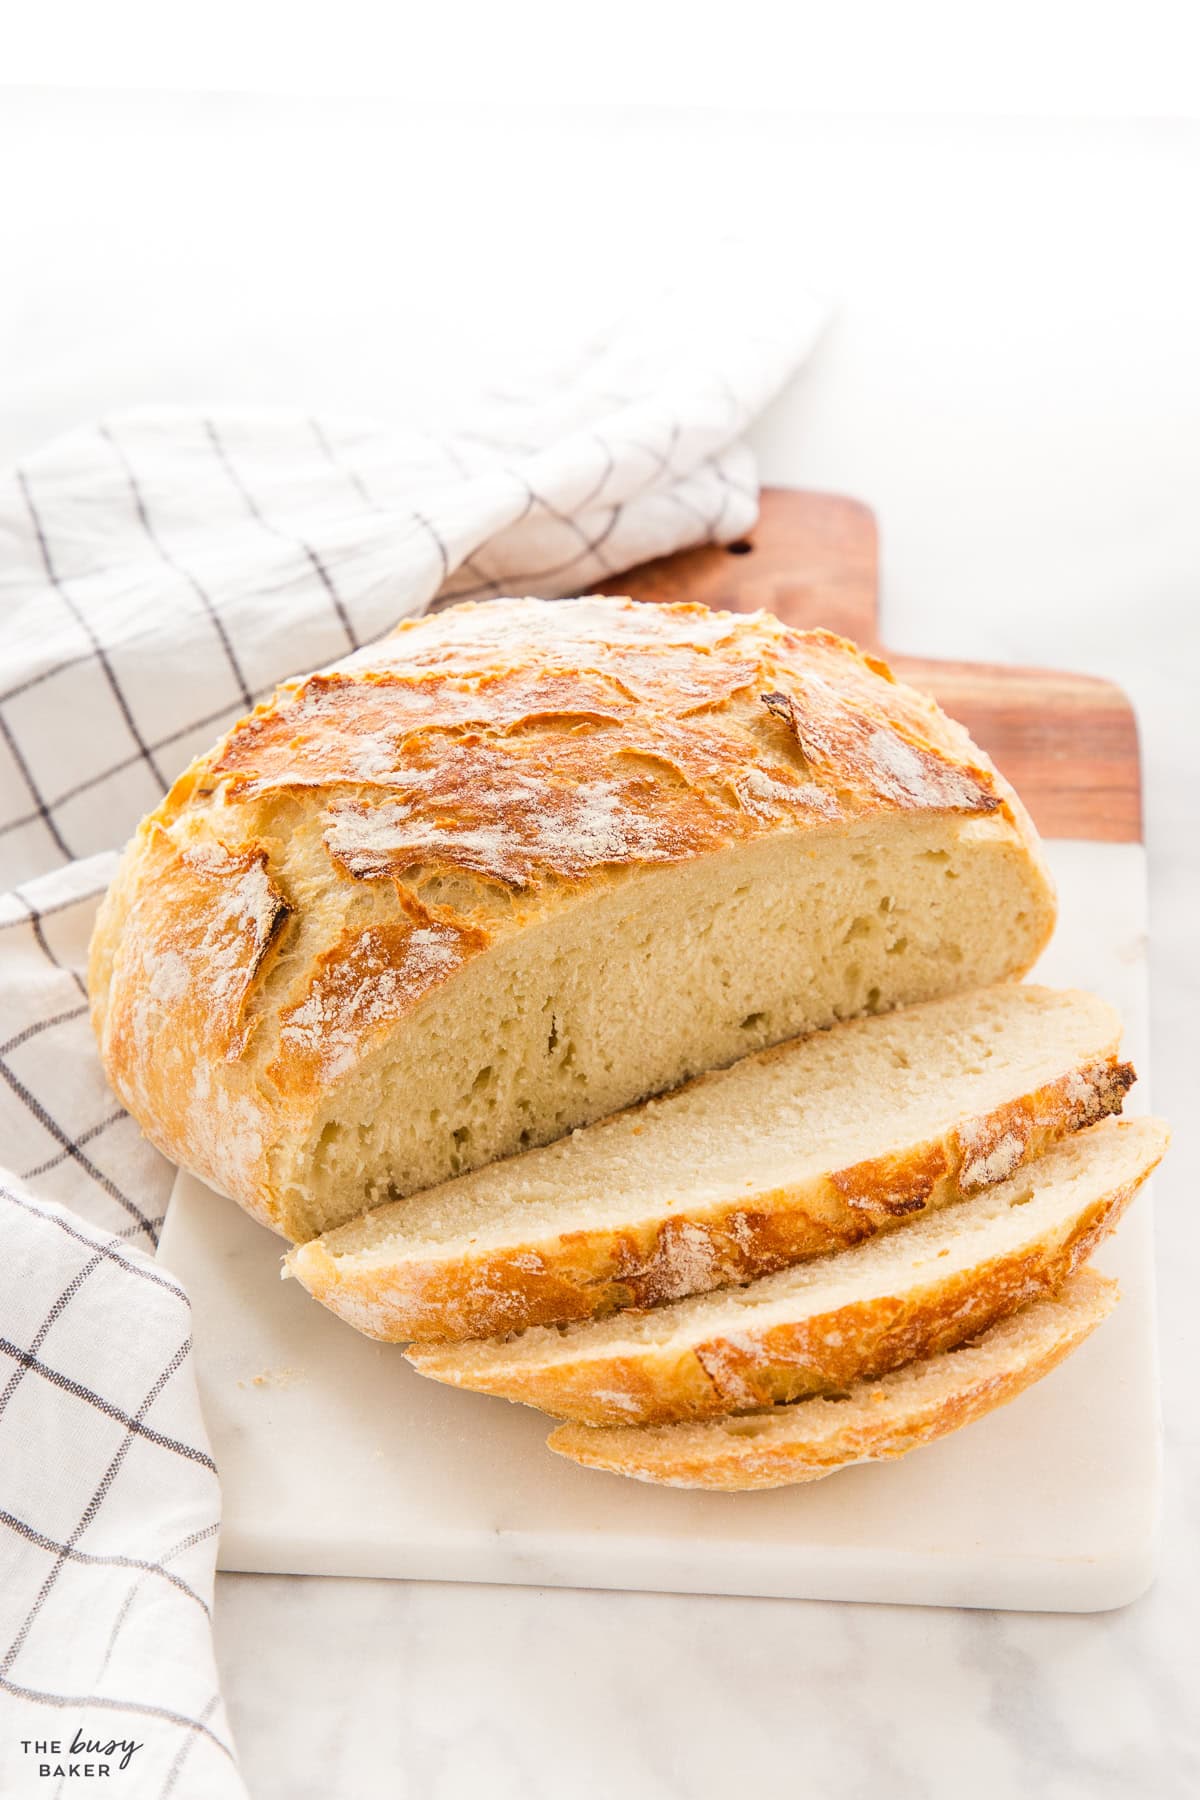
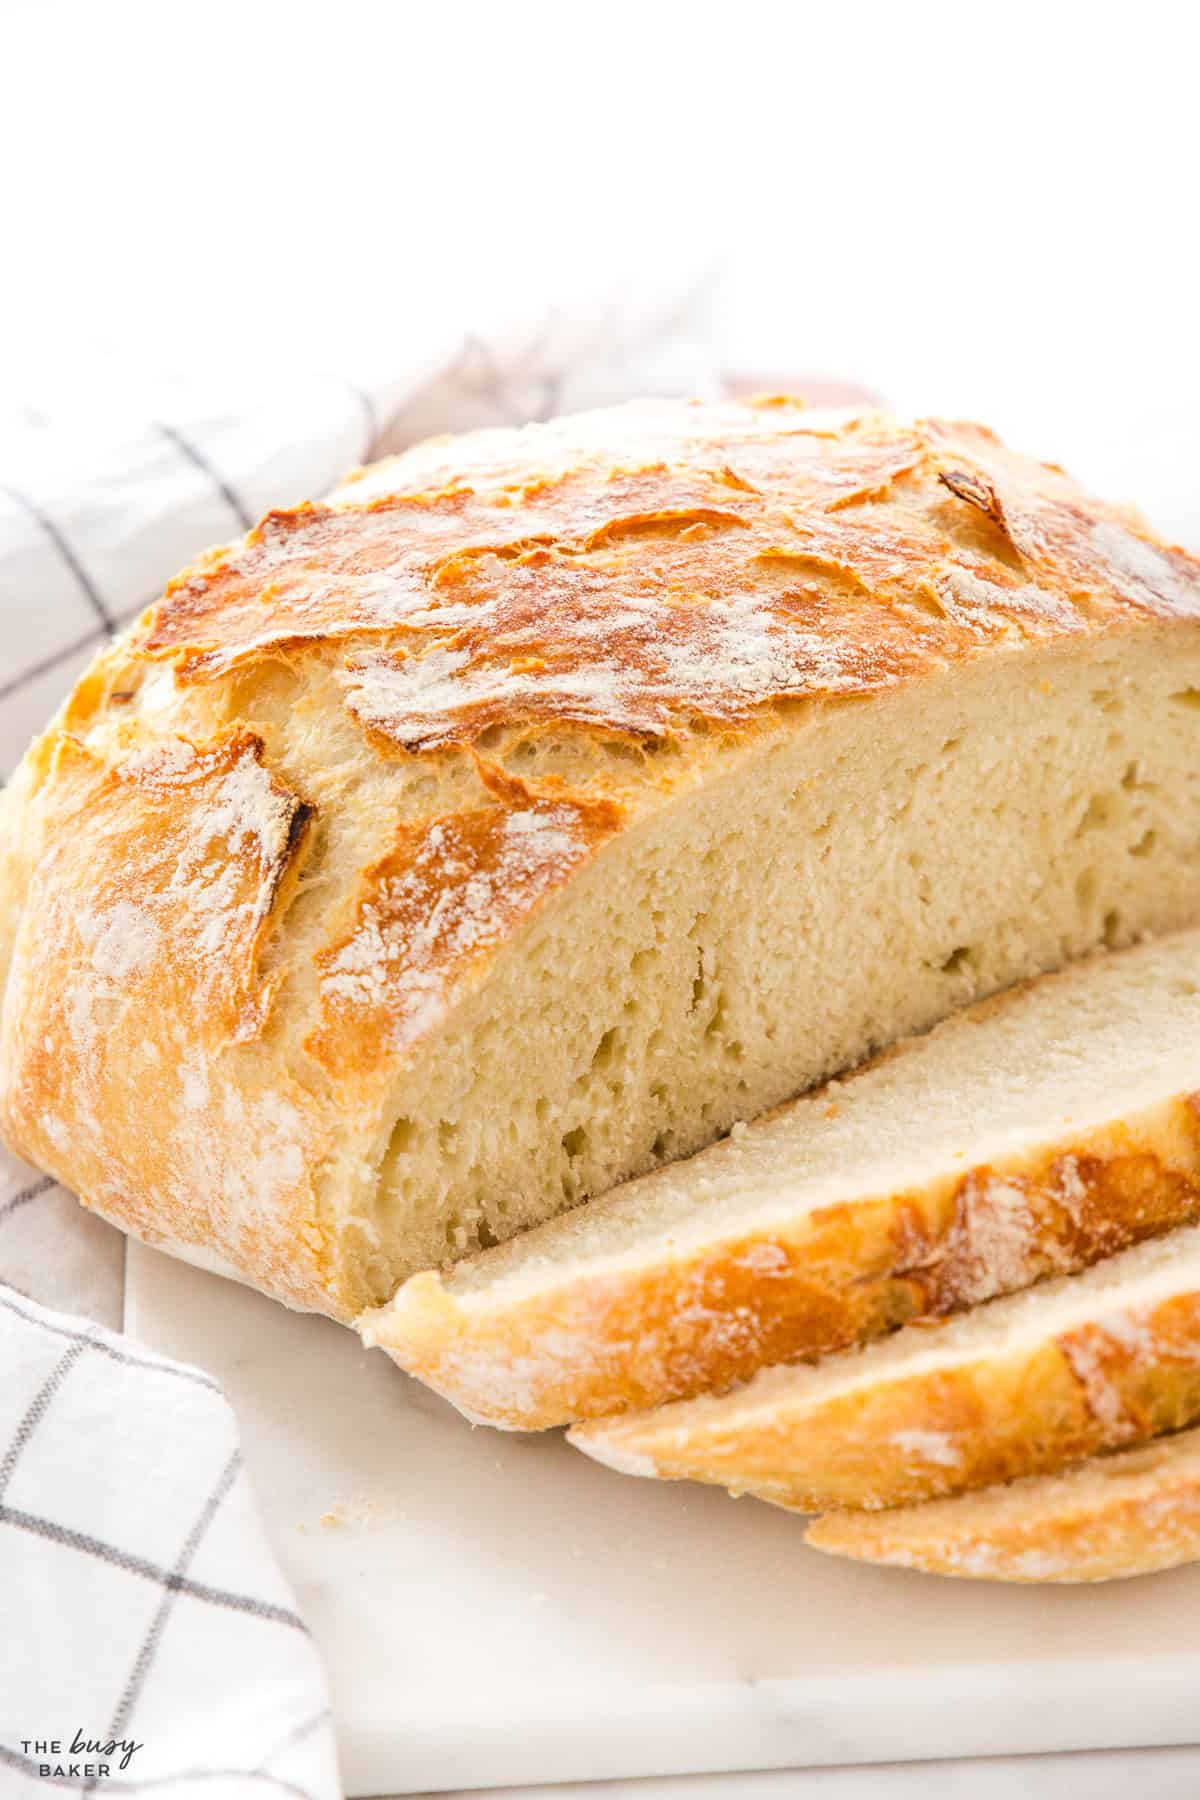
If you’ve ever wished you could bake bakery-quality bread at home, with a crackly crust, airy crumb, and that irresistible fresh-bread smell that permeates your whole home, you’re going to LOVE this No-Knead Artisan Bread recipe. With only four basic ingredients (flour, water, salt, and a bit of yeast), a little bit of patience, and almost no effort at all, you can have a loaf that rivals anything from a professional bakery. The hands-on time is minimal but the payoff is absolutely huge: a loaf with a deep, golden crust, a soft and chewy interior, and the kind of rustic style that makes even simple meals feel just a little more special.
No-Knead Artisan Bread is a style of bread that skips the traditional kneading step and instead relies on a long, slow rise (usually 12–18 hours) so the gluten develops naturally and the dough builds strength on its own. Because the dough is fairly wet and the yeast minimal, the slow fermentation gives time for flavour to deepen, texture to improve, and for that beautiful open crumb and crisp crust to form. This method of bread-making isn’t a trendy new invention — people have been relying on long fermentation rather than kneading for centuries — but it was given a modern boost when the simple, no-fuss approach was popularized for home bakers. The draw of no-knead bread lies in its simplicity, the ease it brings to homemade baking, and the stunning, rustic loaves it produces with very little hands-on work.
This no-knead method works because time does the work for you. The long rise allows the dough to fully hydrate, which strengthens the gluten strands without any kneading. The slow fermentation also builds a deeper, more complex flavour that you simply can’t get from quick-rise breads with lots of yeast. Baking the dough in a preheated Dutch oven traps steam around the loaf, which helps create that crackly, blistered crust that’s the hallmark of good artisan bread.
Even though the ingredient list is short and the process is simple, the results are consistently impressive. It’s the kind of bread that looks like it came from a bakery, but it comes together with almost no effort, making it simple enough for even beginning bakers.
There are SO many reasons why we LOVE this easy no knead artisan bread recipe. Here are just a few!
- It requires MINIMAL EFFORT – there’s no kneading and no stretch and fold required, and you end up with a super professional-looking loaf that looks like you spent hours in the kitchen.
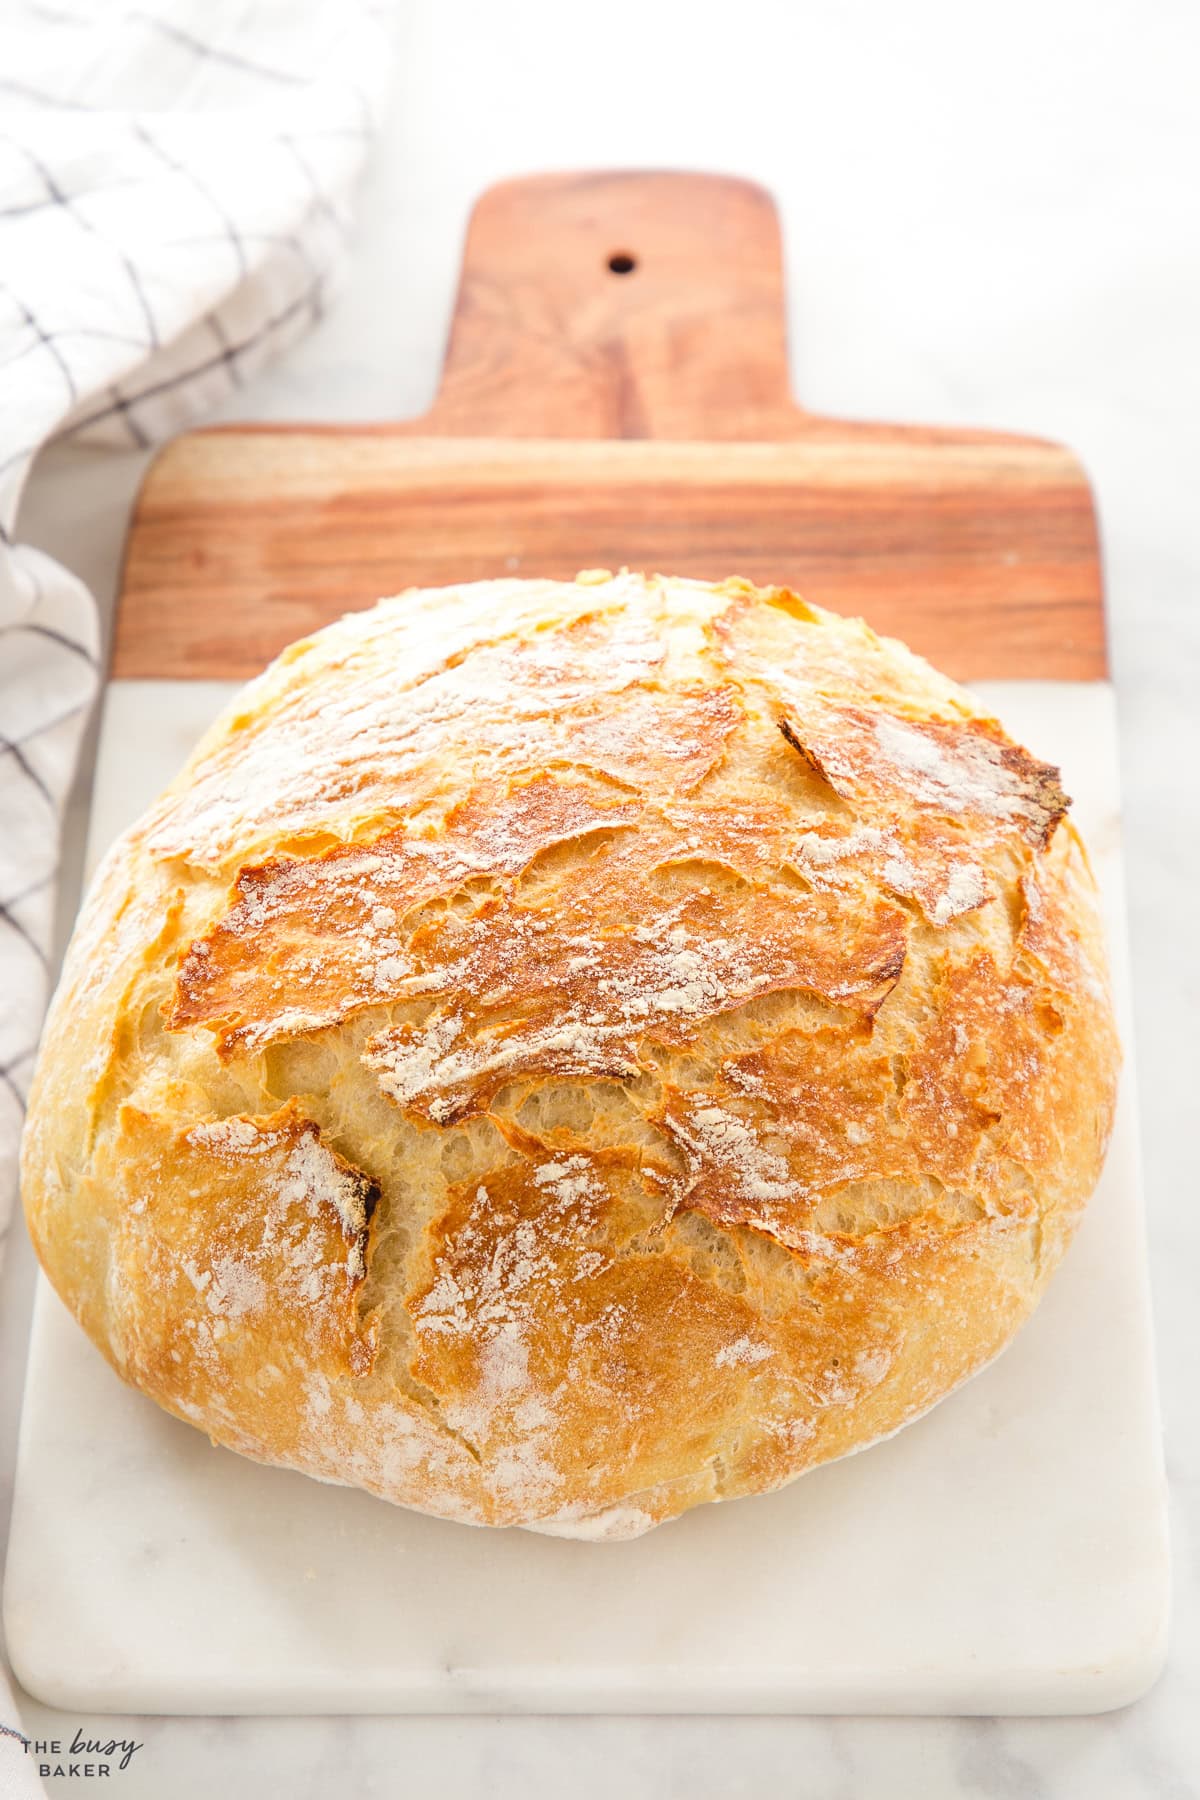
- It’s RUSTIC – with a crispy crust and a soft interior, it’s the perfect loaf that LOOKS homemade and tastes like heaven.
- It’s FOOLPROOF – you don’t need baking experience to make this bread…it’s easy and completely unpretentious.
- It’s IMPRESSIVE – it’s so crusty and delicious, and SO beautiful. Your friends and family will not believe it’s homemade!
We make this easy artisan bread ALL the time in our house, and here’s a list of our favourite things to serve it with!
- Tomato Soup
- Meatball Soup
- Turkey Chili
- Pumpkin Chili
- Best Beef Stew
- Chicken Corn Chowder
- Easy Roasted Red Pepper Hummus
- Vegetable Stew
Want to make the BEST homemade artisan bread? Here’s all our best PRO tips and tricks for the best loaf you’ll ever bake!
The signature flavour and crumb are developed during the rise times, especially the long rise. Make sure you mix your dough the day before you want to bake it and give it all the time it needs.
Don’t mix, poke, or disturb the dough in any way during the 12-18 hour raise. Make sure you find a draft free, warm place for it. We like raising it in the oven, without turning the oven on, of course.
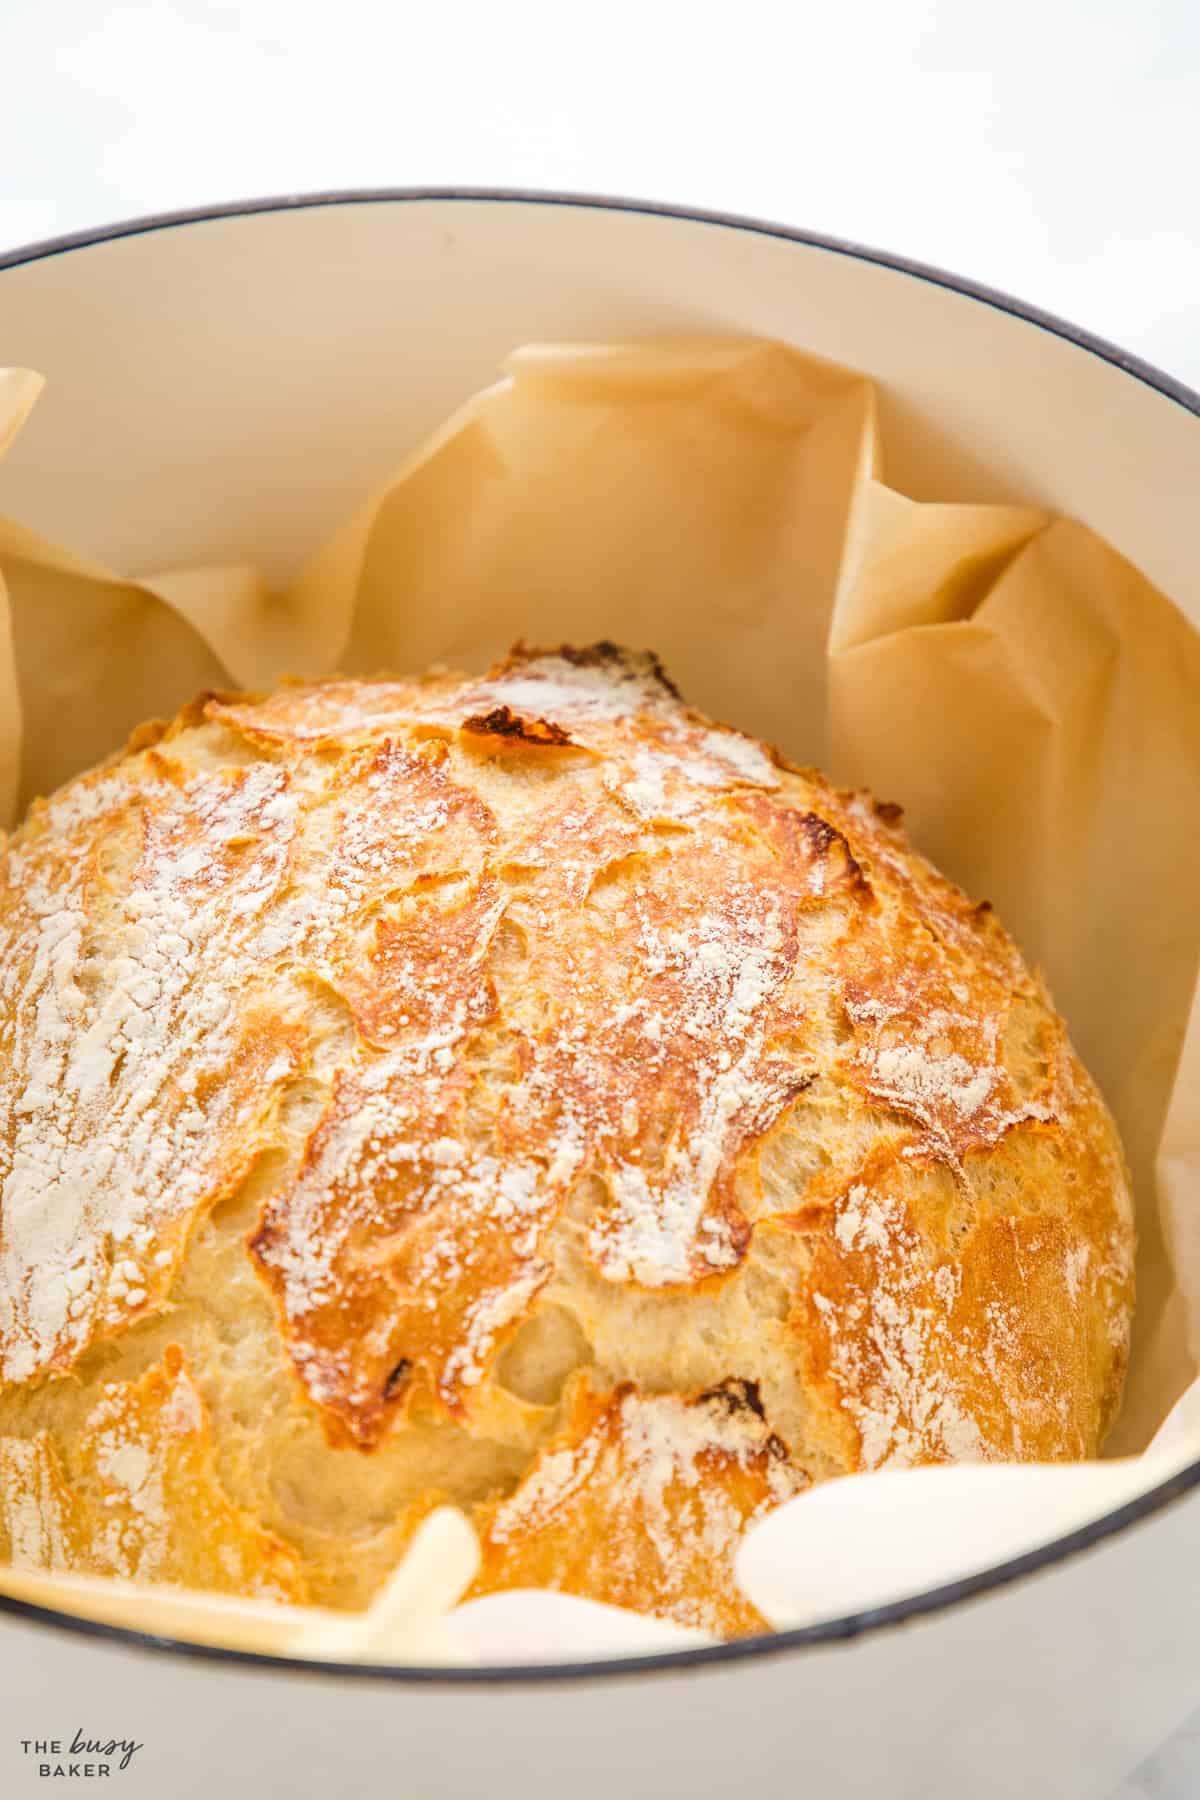
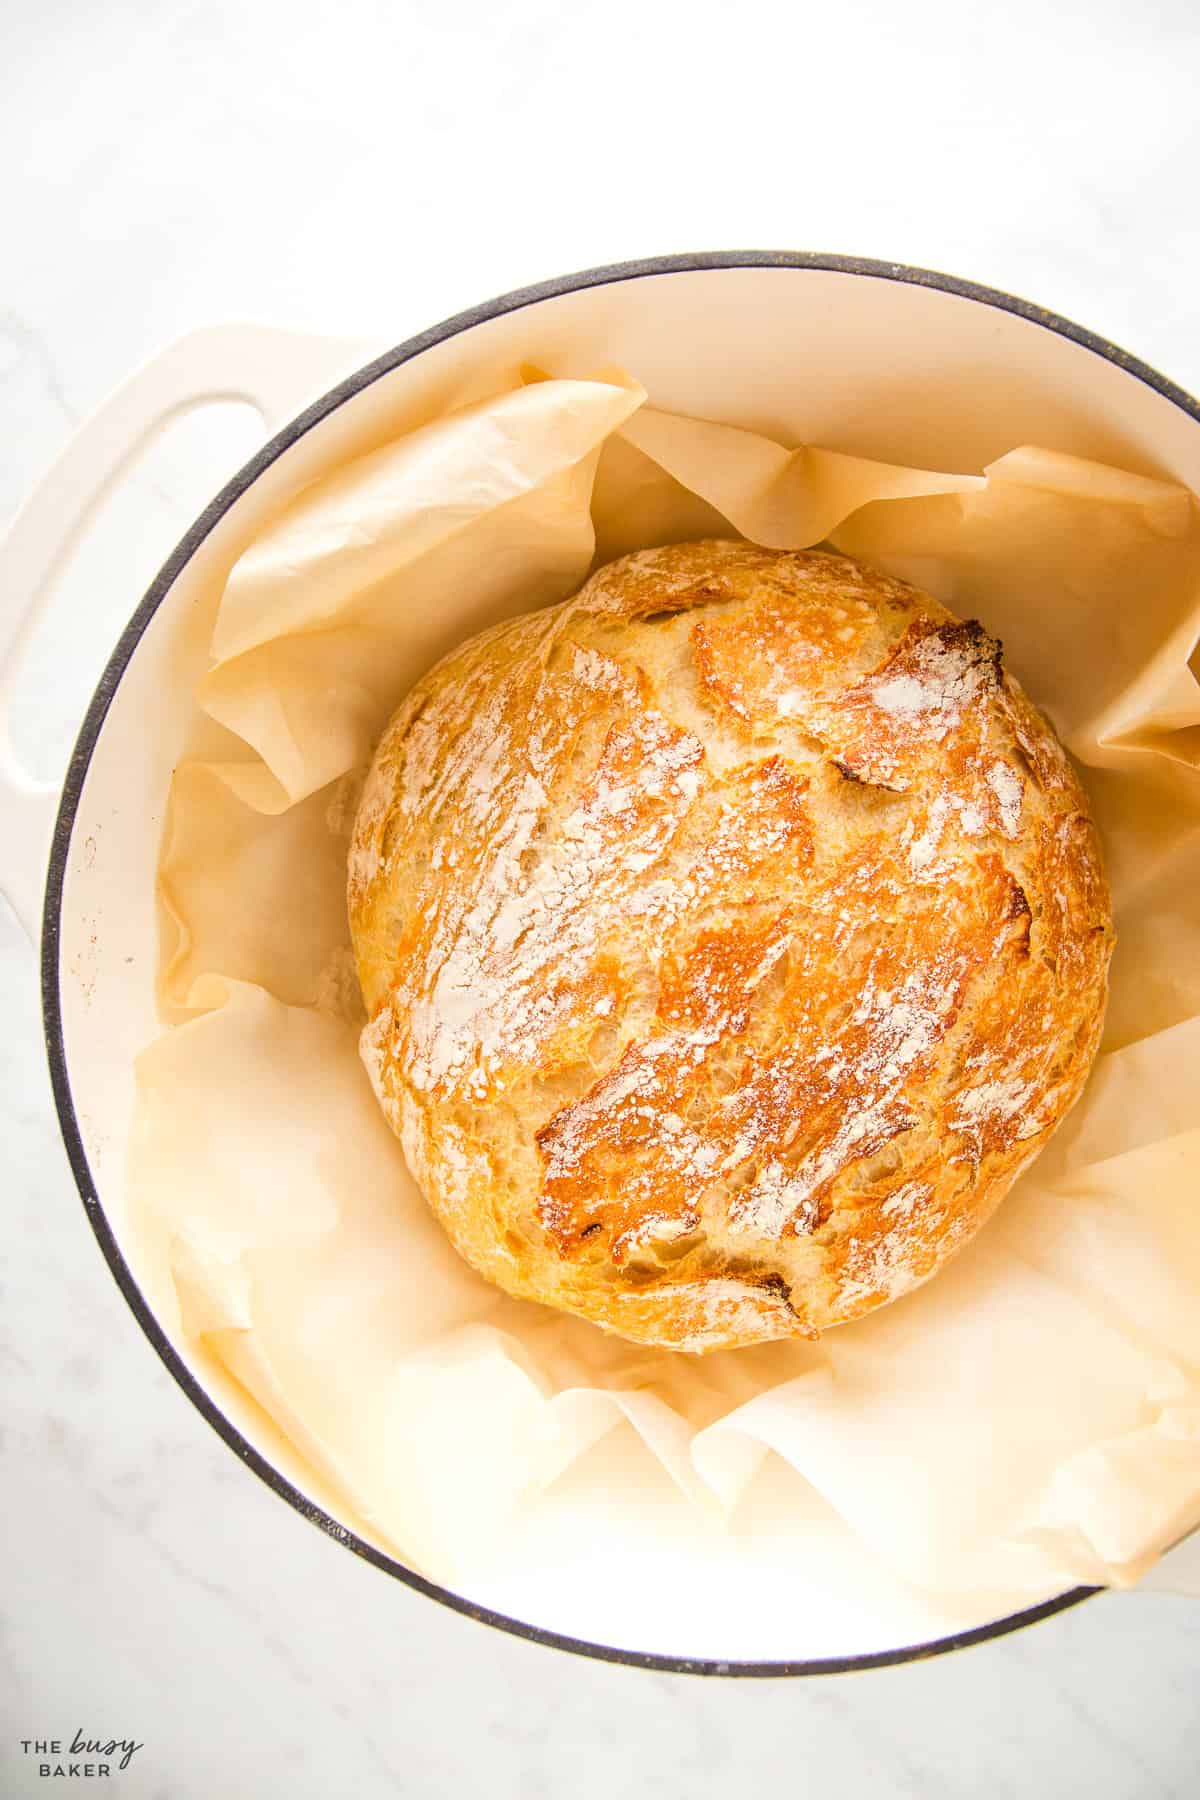
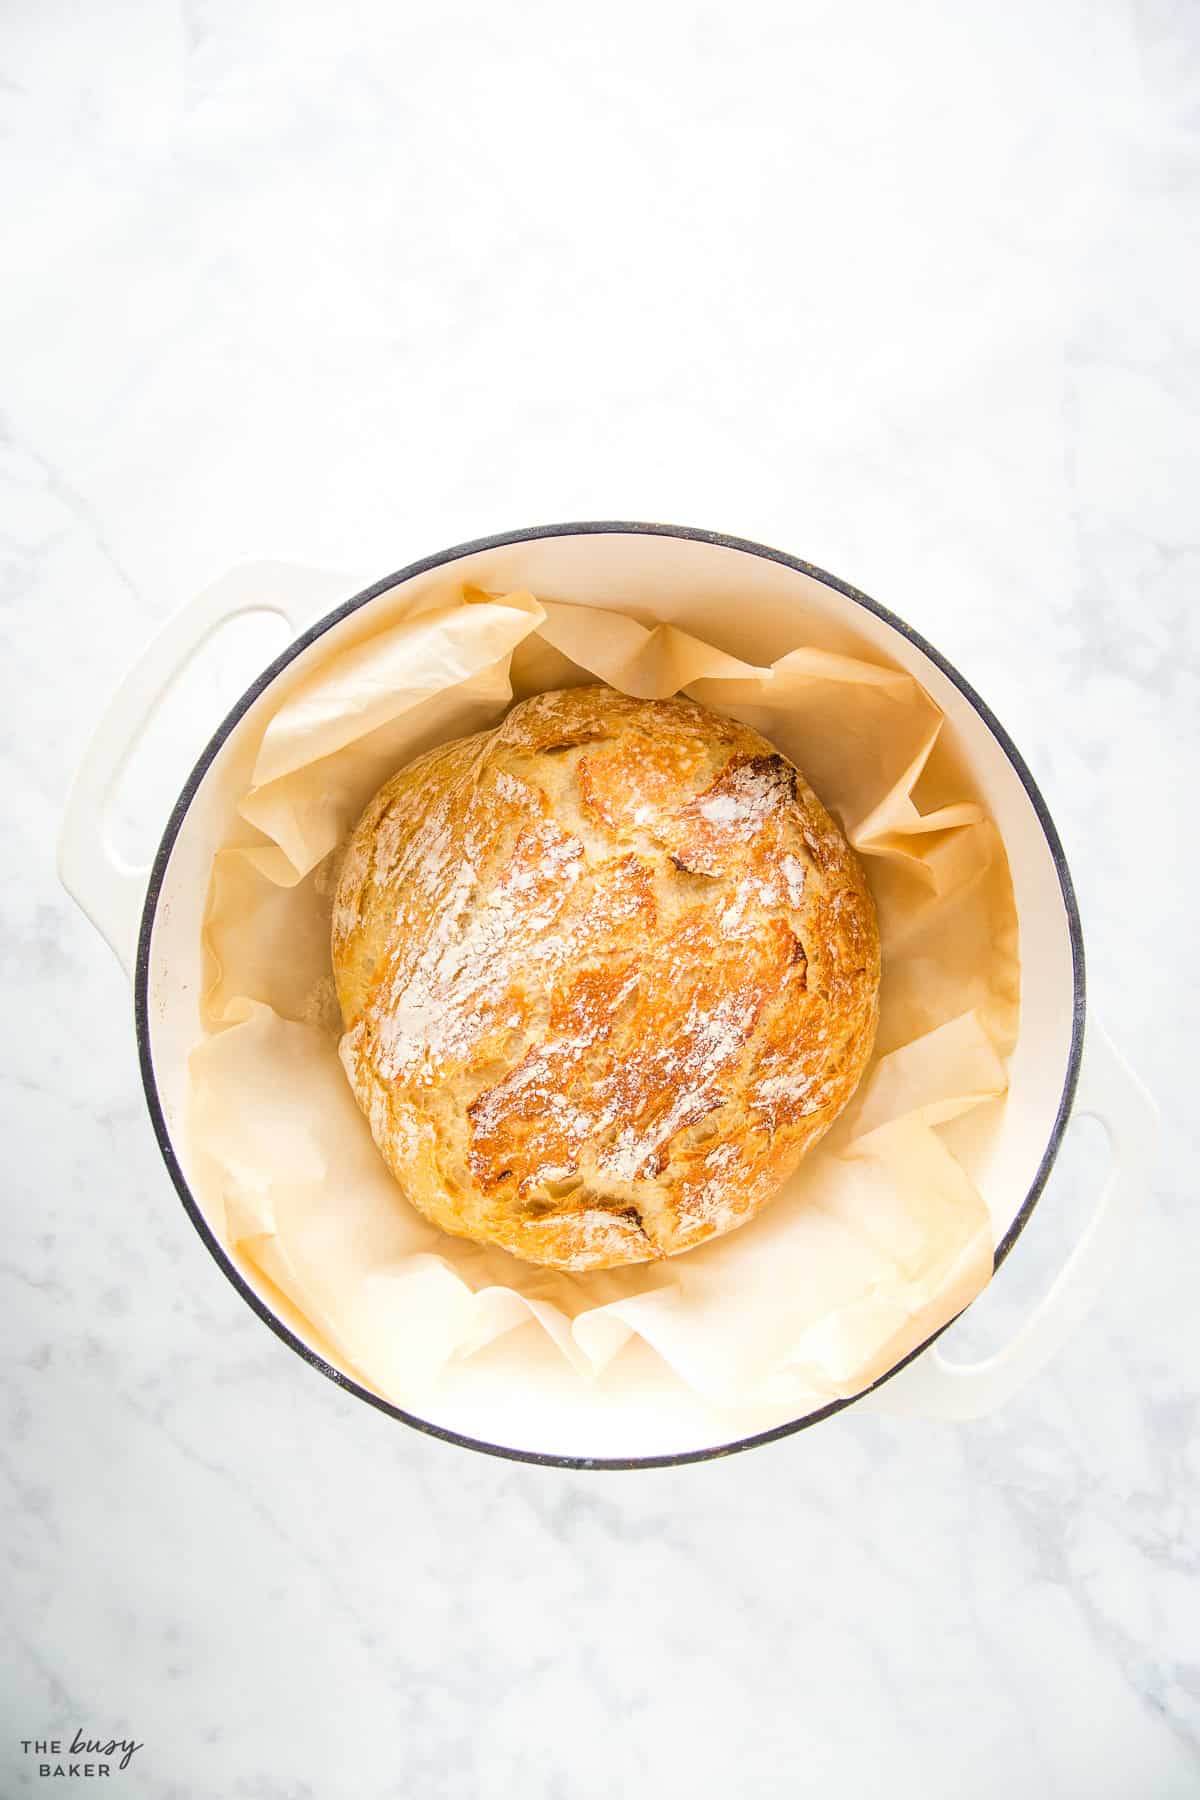
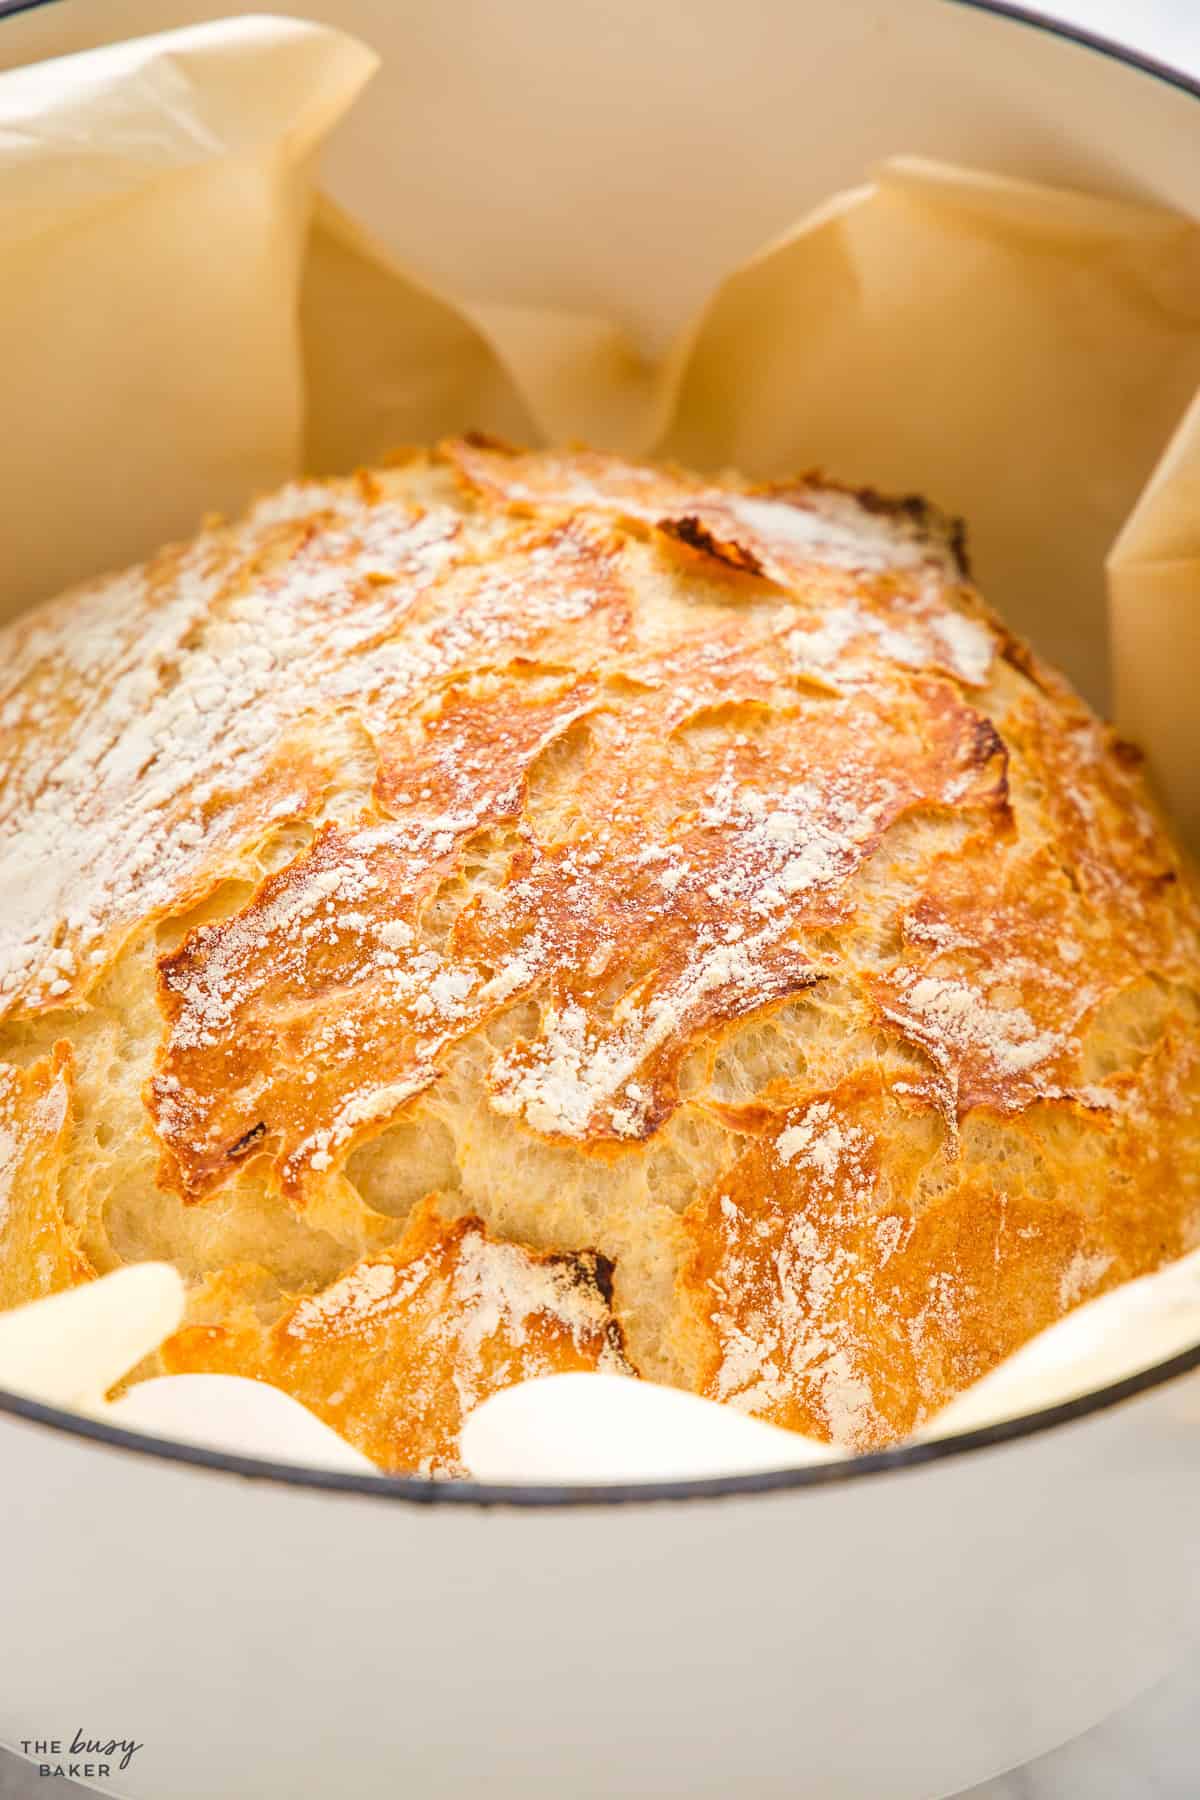
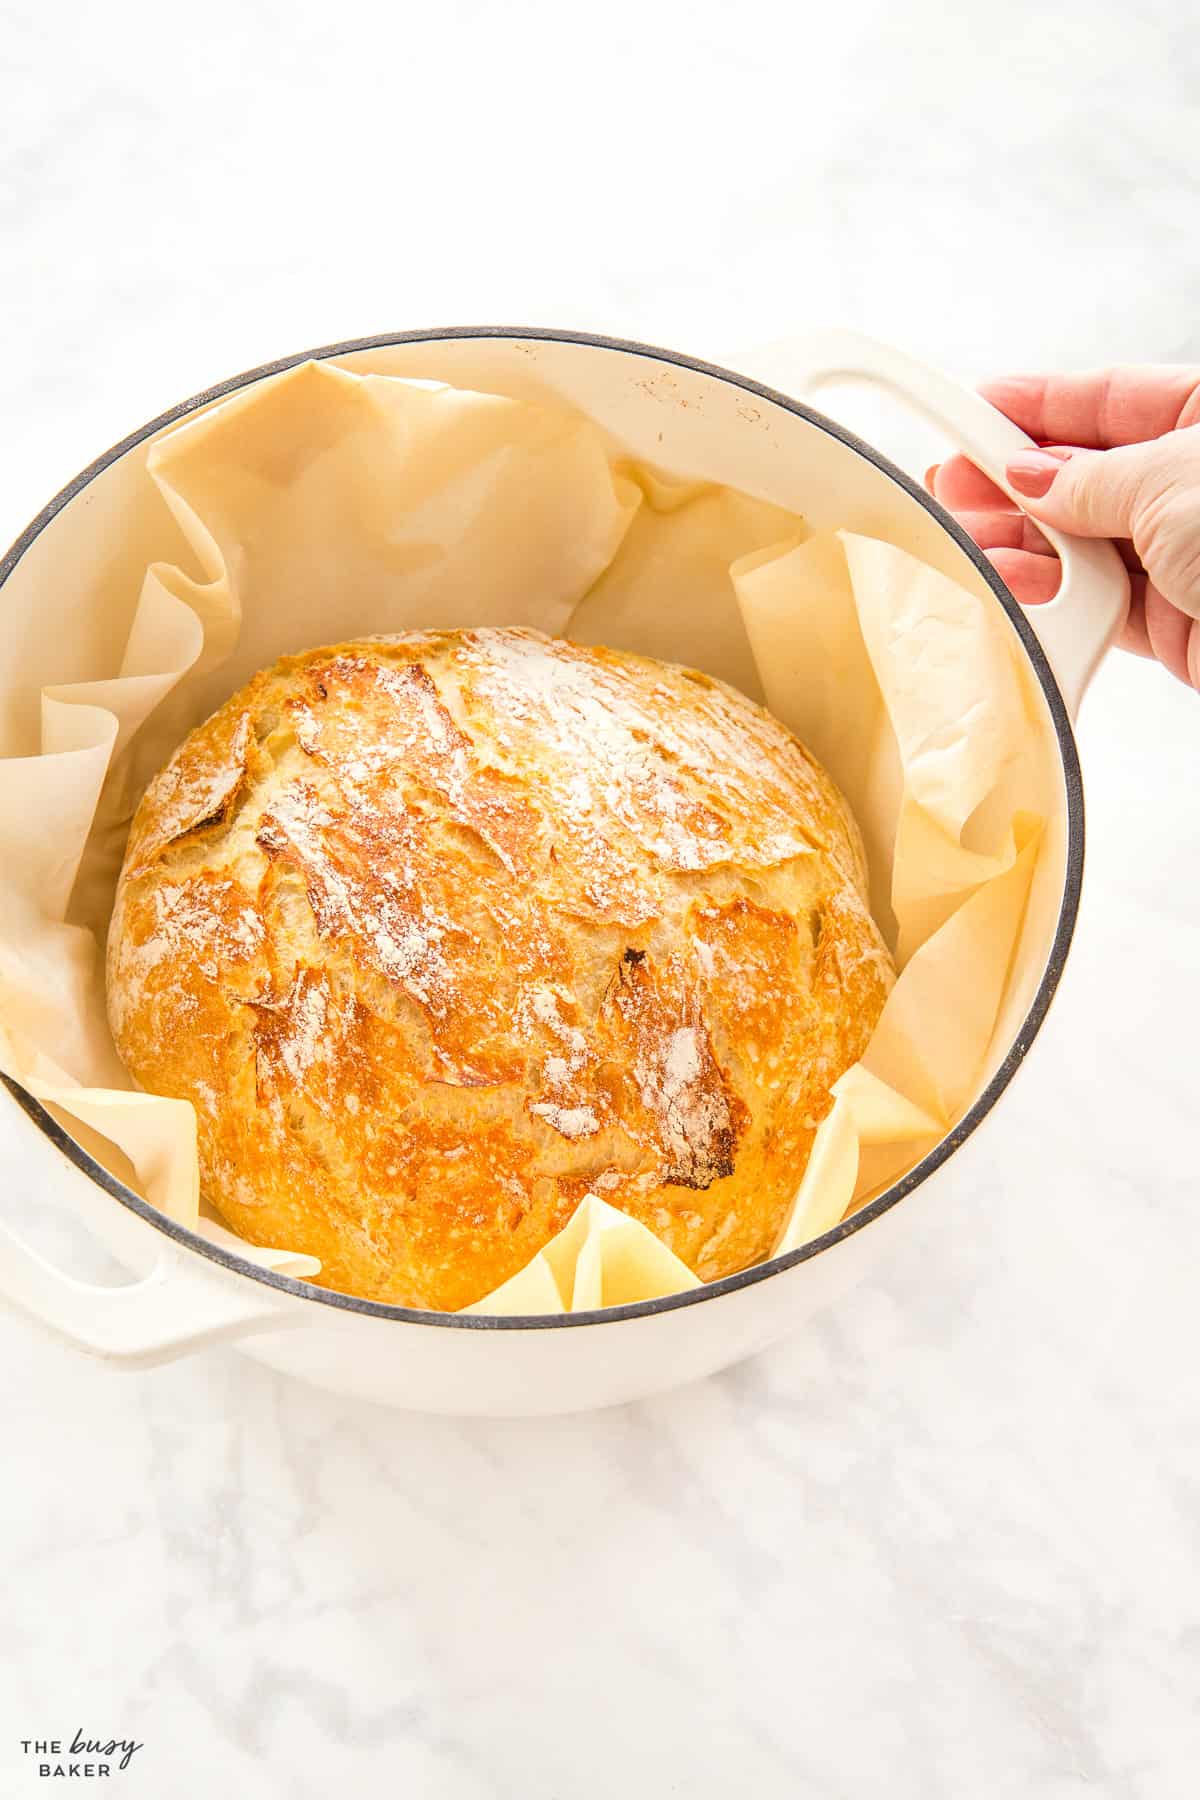
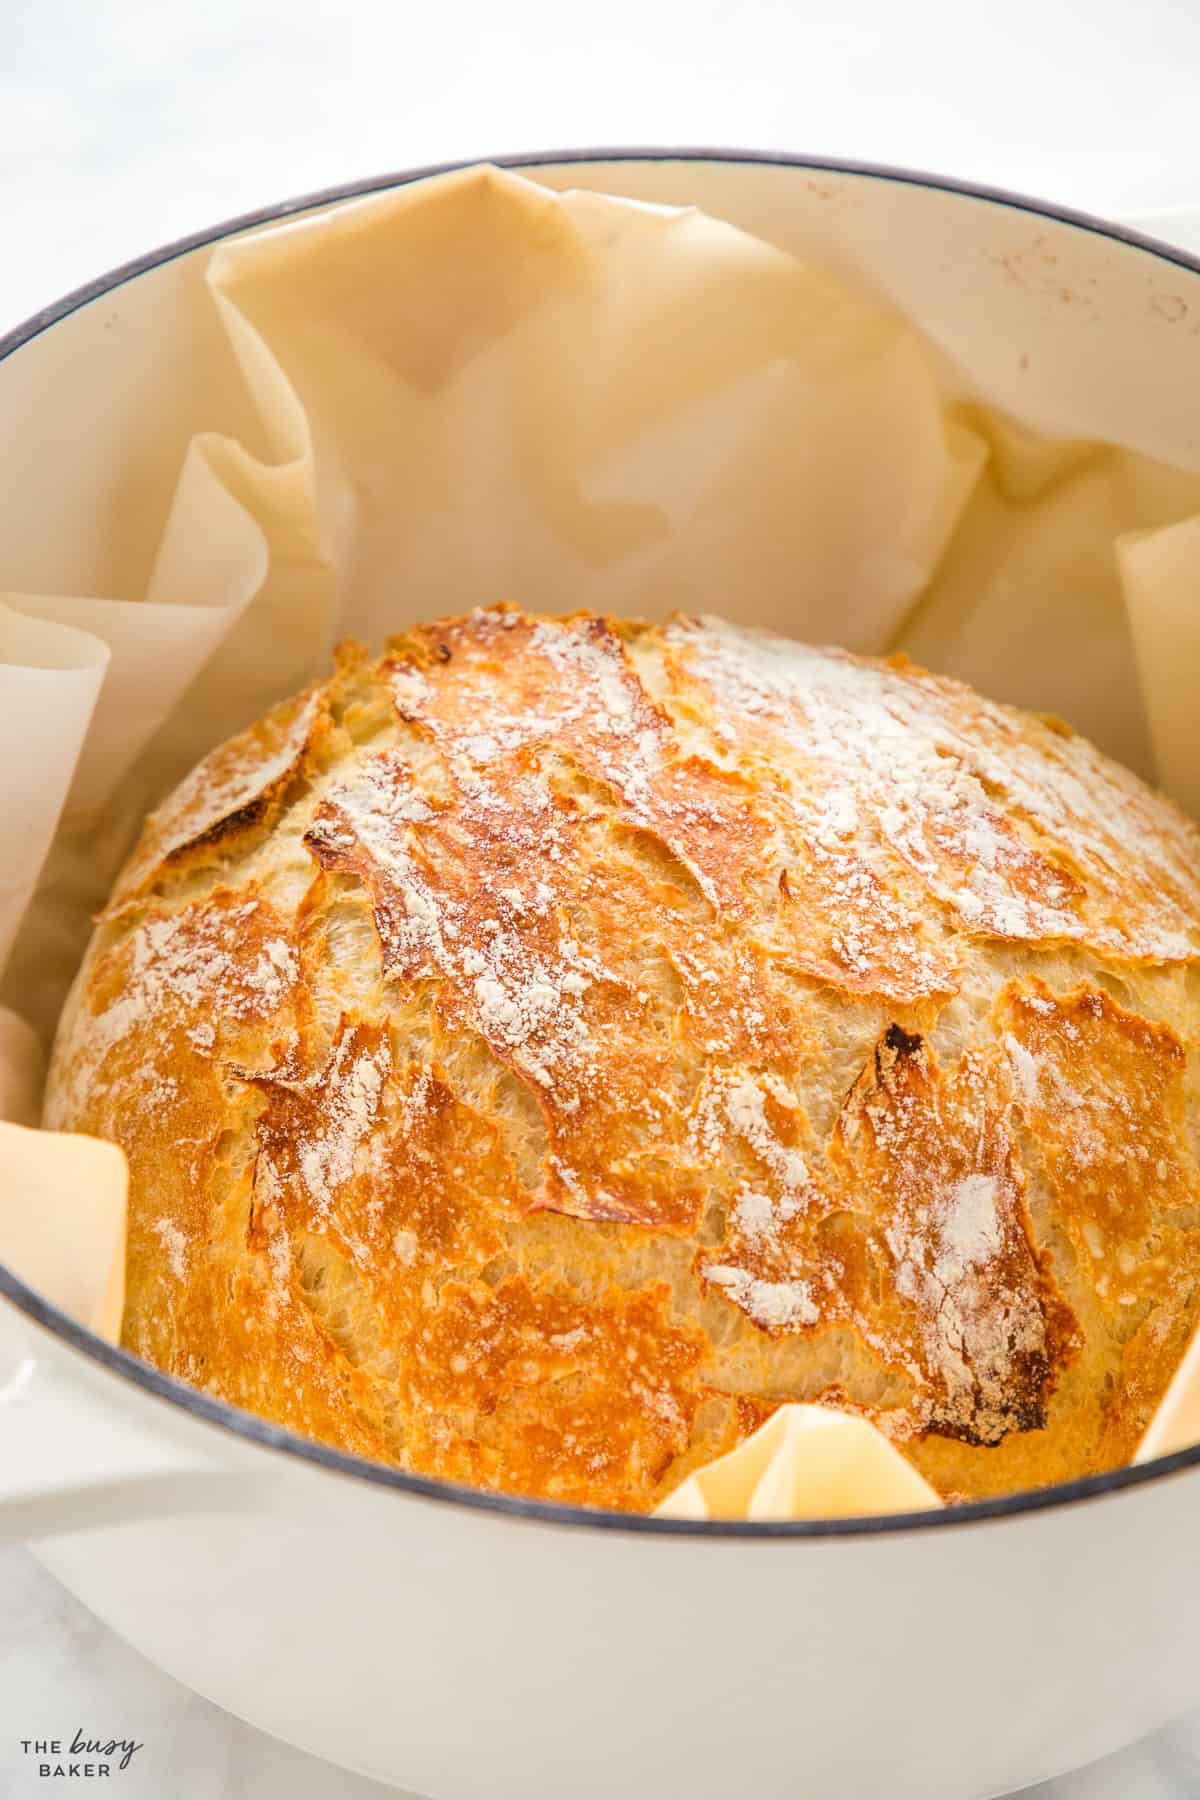
Putting your cold dough in the preheated dutch oven or cast iron pot, and covering it with a lid ensures that bakery style, crisp, golden crust. Make sure you don’t remove the lid within the first 30 minutes of baking so the steamy environment can create that yummy crust.
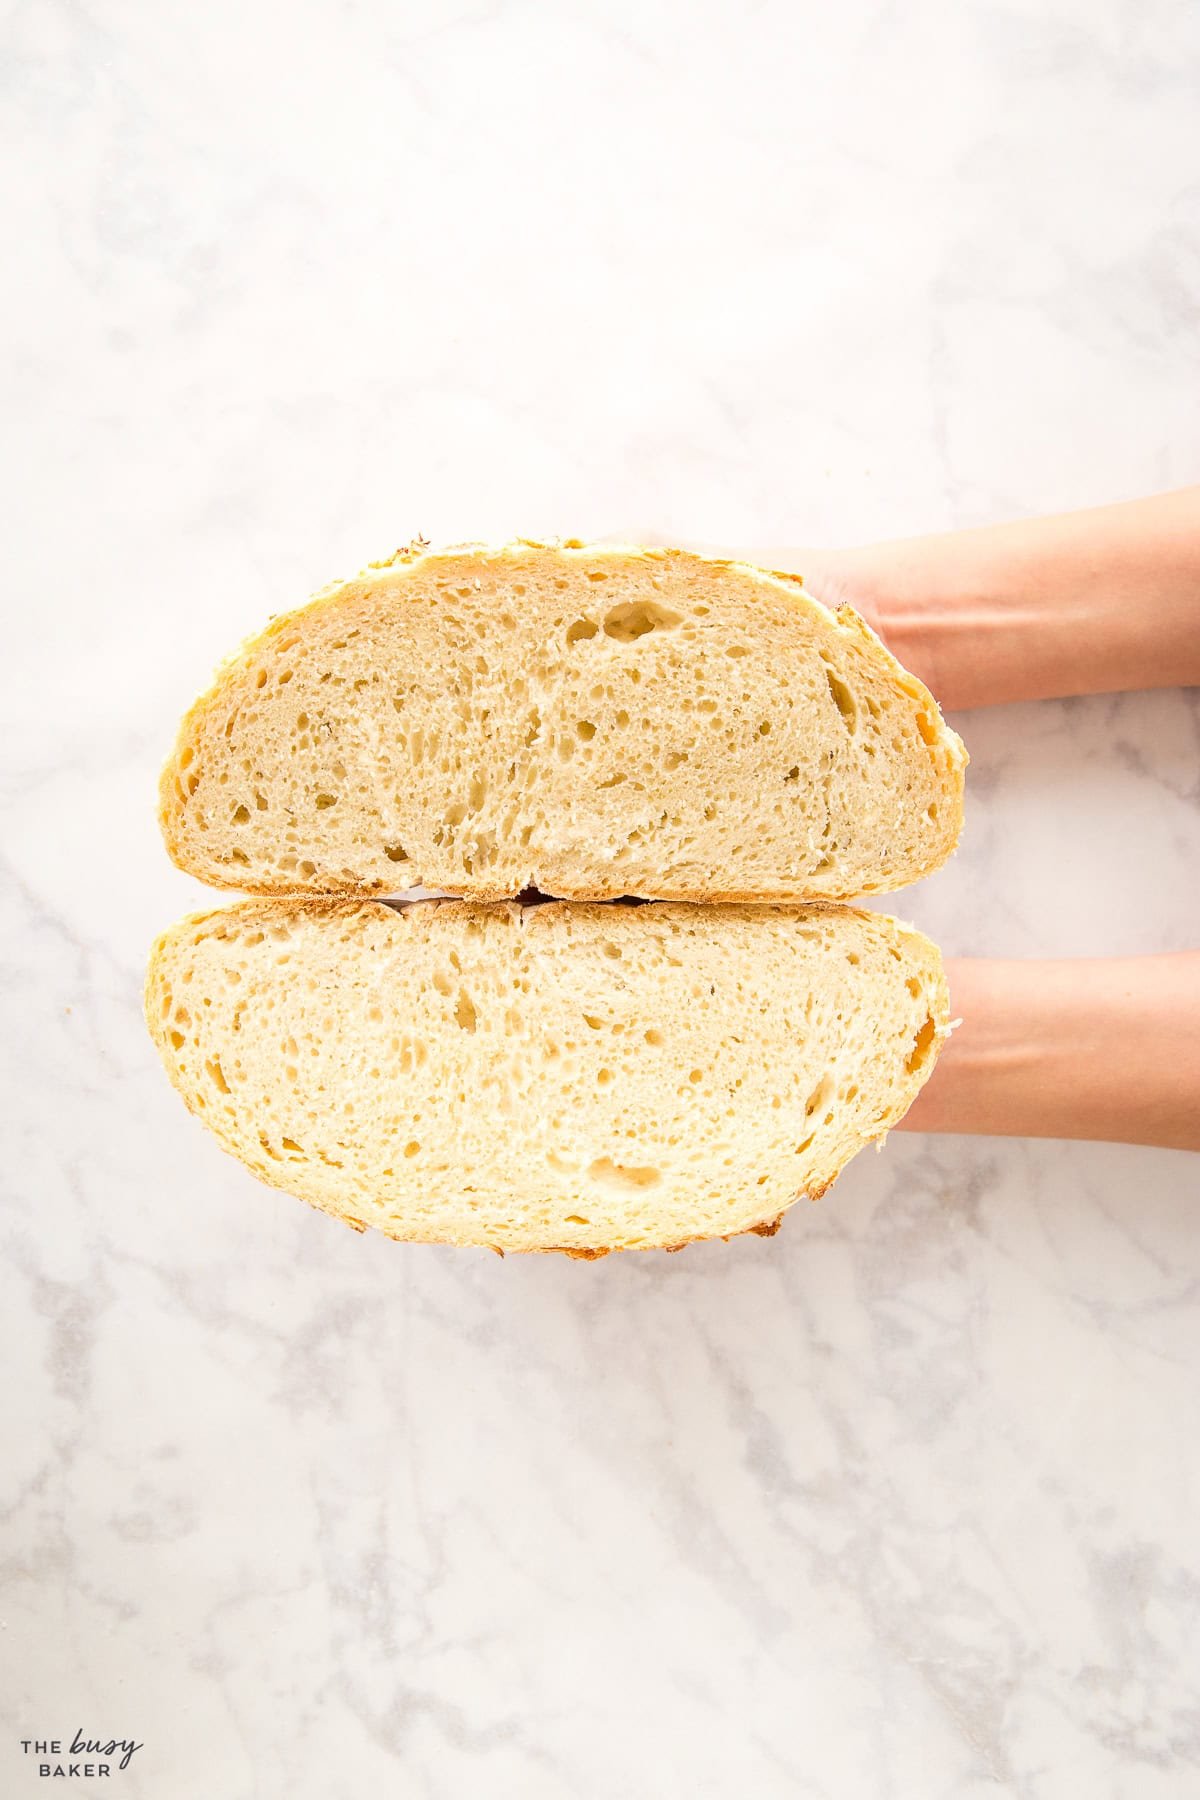
We are the first ones to admit that it’s hard to wait for the bread to cool down before slicing into it. We love eating it a bit warm with butter, cheese, or dipped in some good olive oil. However, for best results we let it cool down on a cooling rack before slicing into it, to make sure that we get the perfect crumb.
Store your bread loosely wrapped in paper towel or a kitchen towel in a resealable bag or in a paper bag on the counter. If the crust softens, pop the bread back in the oven for 5-10 minutes at 350 degrees Fahrenheit (175 degrees Celsius).
If you want an even fluffier loaf that rises extra high, add 1 tablespoon of Vital Wheat Gluten to the dough with the flour to create a very voluminous dough that rises beautifully every single time and doesn’t have a quite as chewy texture.
Running into trouble with this no knead bread recipe? Here are some common issues you might encounter and how to fox or prevent them:
If your dough seems too fluid after the first rise, simply add 1/4 to 1/3 cup of flour to the top of the dough and mix it in, shaping the loaf into a round shape to rise again while the oven pre-heats.
If your loaf falls or flattens during the second rise, simply re-shape before baking into as tight a ball as possible (creating surface tension should prevent the dough from falling).
If the bottom crust of your bread burns or becomes too hard or tough, it’s likely that the bottom burner of your oven is too hot OR you’re using a pot that’s black on the inside (these conduct heat more efficiently than one that’s a light colour on the inside). Try lowering your oven temperature by 25 degrees, using the convection setting, or using a different pot that’s light in colour on the inside.
If your bread doesn’t come out golden brown, use an oven thermometer to make sure your oven temperature is correct. If your oven runs hot, lower the temperature of your oven by 25 degrees to be sure you don’t burn the bread.
Here’s the basic kitchen equipment you’ll need to bake this easy no knead bread recipe (paid links):
- large mixing bowl
- large dutch oven pot
- Parchment Paper
- Bread Knife
- Plastic Wrap
- wooden spoon or spatula
There’s only 4 ingredients in this easy No Knead Artisan Bread recipe. Here’s what you’ll need to make it (paid links):
- 3 1/4 cups all purpose flour or bread flour
- 1/2 teaspoon instant yeast
- 2 teaspoons sea salt
- 1 1/2 cups water at room temperature

We’ve shared SO many variations on this easy no knead bread recipe. Here are a few of our favourites!
- Quick No Knead Bread – exactly the same bread, but with a quick rise twist!
- No Knead Honey Oat Artisan Bread – a sweet, fragrant bread made with oats and honey
- No Knead Whole Wheat Bread – a healthier, heartier version of the classic made with whole wheat flour
- No Knead Jalapeno Cheese Artisan Bread – perfect for serving with soups and for making sandwiches, this bread is cheesy and spicy!
- Easy No Knead Cinnamon Raisin Artisan Bread – amazing for toast and a mildly sweet treat, made with cinnamon and raisins!
- No-Knead Cranberry Walnut Bread with Honey – a decadent loaf made with honey, cranberries, and chopped walnuts.
Time needed: 13 hours and 5 minutes
Here’s how to make this homemade artisan bread, step-by-step!
- Prepare the dough
Start with a large bowl and a wooden spoon, and add your flour to the bowl. Measure the yeast and add it to one side of the bowl. Measure the salt and add it to the other side.
Using a wooden spoon, stir the yeast into the flour on its side of the bowl first and then stir the salt into the flour on its side of the bowl. This will prevent the salt mixing directly with the yeast. Give the whole mixture a few good stirs to make sure everything is combined.
Once the dry ingredients are combined, measure the water. Make sure the water is at room temperature; water that is too warm or too cold can kill the yeast and prevent the bread from rising at all. Pour the water in and stir with a wooden spoon. The dough will be rough and a bit sticky, but that’s normal. Stir until all the flour is combined. This is not normal bread dough (there’s no kneading involved in this recipe), so you don’t need to be too concerned about the appearance of the dough at this point. Just make sure the ingredients are combined well. - Raise it
Cover the bowl with plastic wrap. It’s a good idea to ensure there’s adequate space left in the bowl for the dough to at least double in size. Place the bowl in a warm spot, draft-free place and let it rise for 12-18 hours.
- Prepare for baking
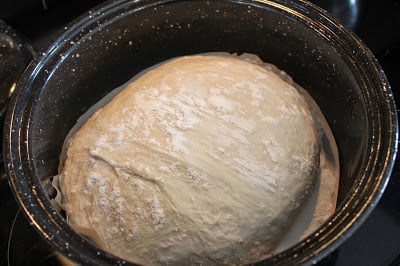
After the dough has risen for 12-18 hours, preheat oven to 450 degrees Fahrenheit (230 degrees Celsius). Place your Dutch oven with the lid on in the cold oven and let it heat up with the oven.
- Shape
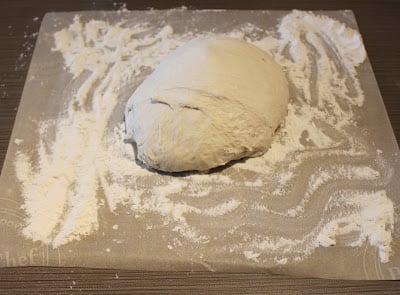
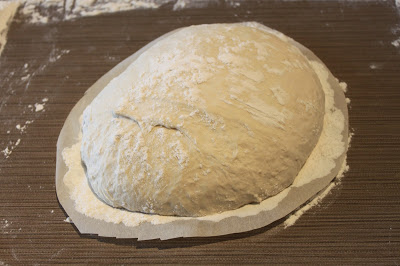
Place a piece of parchment paper on the counter and dust it with flour. Rub flour on your hands and scrape the dough away from the sides of the bowl, gathering it in your hands as best you can (it may feel kind of fluid and not at all like regular bread dough) and forming it into a circular loaf on the parchment paper. Don’t worry if it still looks a little rough in places. This lends to the rustic look of this loaf.
- Raise it for a second time
Once you have it shaped, the dough needs to undergo a second rise (much shorter than the first). The goal is to handle the dough as little as possible at this stage because any amount of tugging at the rough can cause it to deflate after it has undergone its second rise. The next few steps will help prevent this. But don’t worry if it deflates a bit. This bread dough is pretty forgiving.
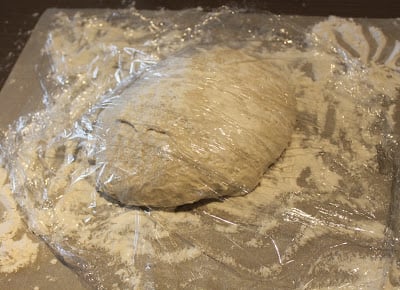
Sprinkle flour over the top of the loaf and loosely cover it with plastic wrap to prevent a skin from forming over the dough. The flour also prevents the plastic wrap from sticking to the dough so when you take it off at the end of the rise, it doesn’t disturb the dough and wreck the rustic shape you’ve created. Let the dough rise for about 45 minutes. Your oven will also be preheating during this time (and so will your pot). - Bake
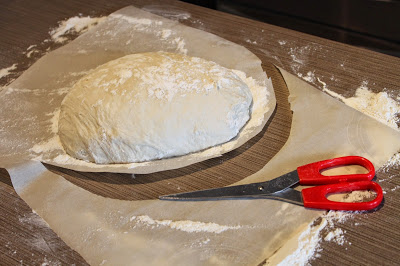
Once 45 minutes have passed, remove the plastic wrap from the dough and trim the parchment paper into a circle closely around the dough. If it doesn’t look like the dough has risen that much, don’t worry about it. The loaf will puff up a bit when it hits the heat of the oven.
Remove the preheated pot from the oven and transfer the dough into the pot as carefully as possible by handling only the parchment paper. Place the lid on the pot and return it to the oven for 30 minutes. Don’t open the oven during this time, and certainly don’t take the lid off the pot; the crispness of the crust develops because of the steam that builds up in the pot during this 30 minutes.
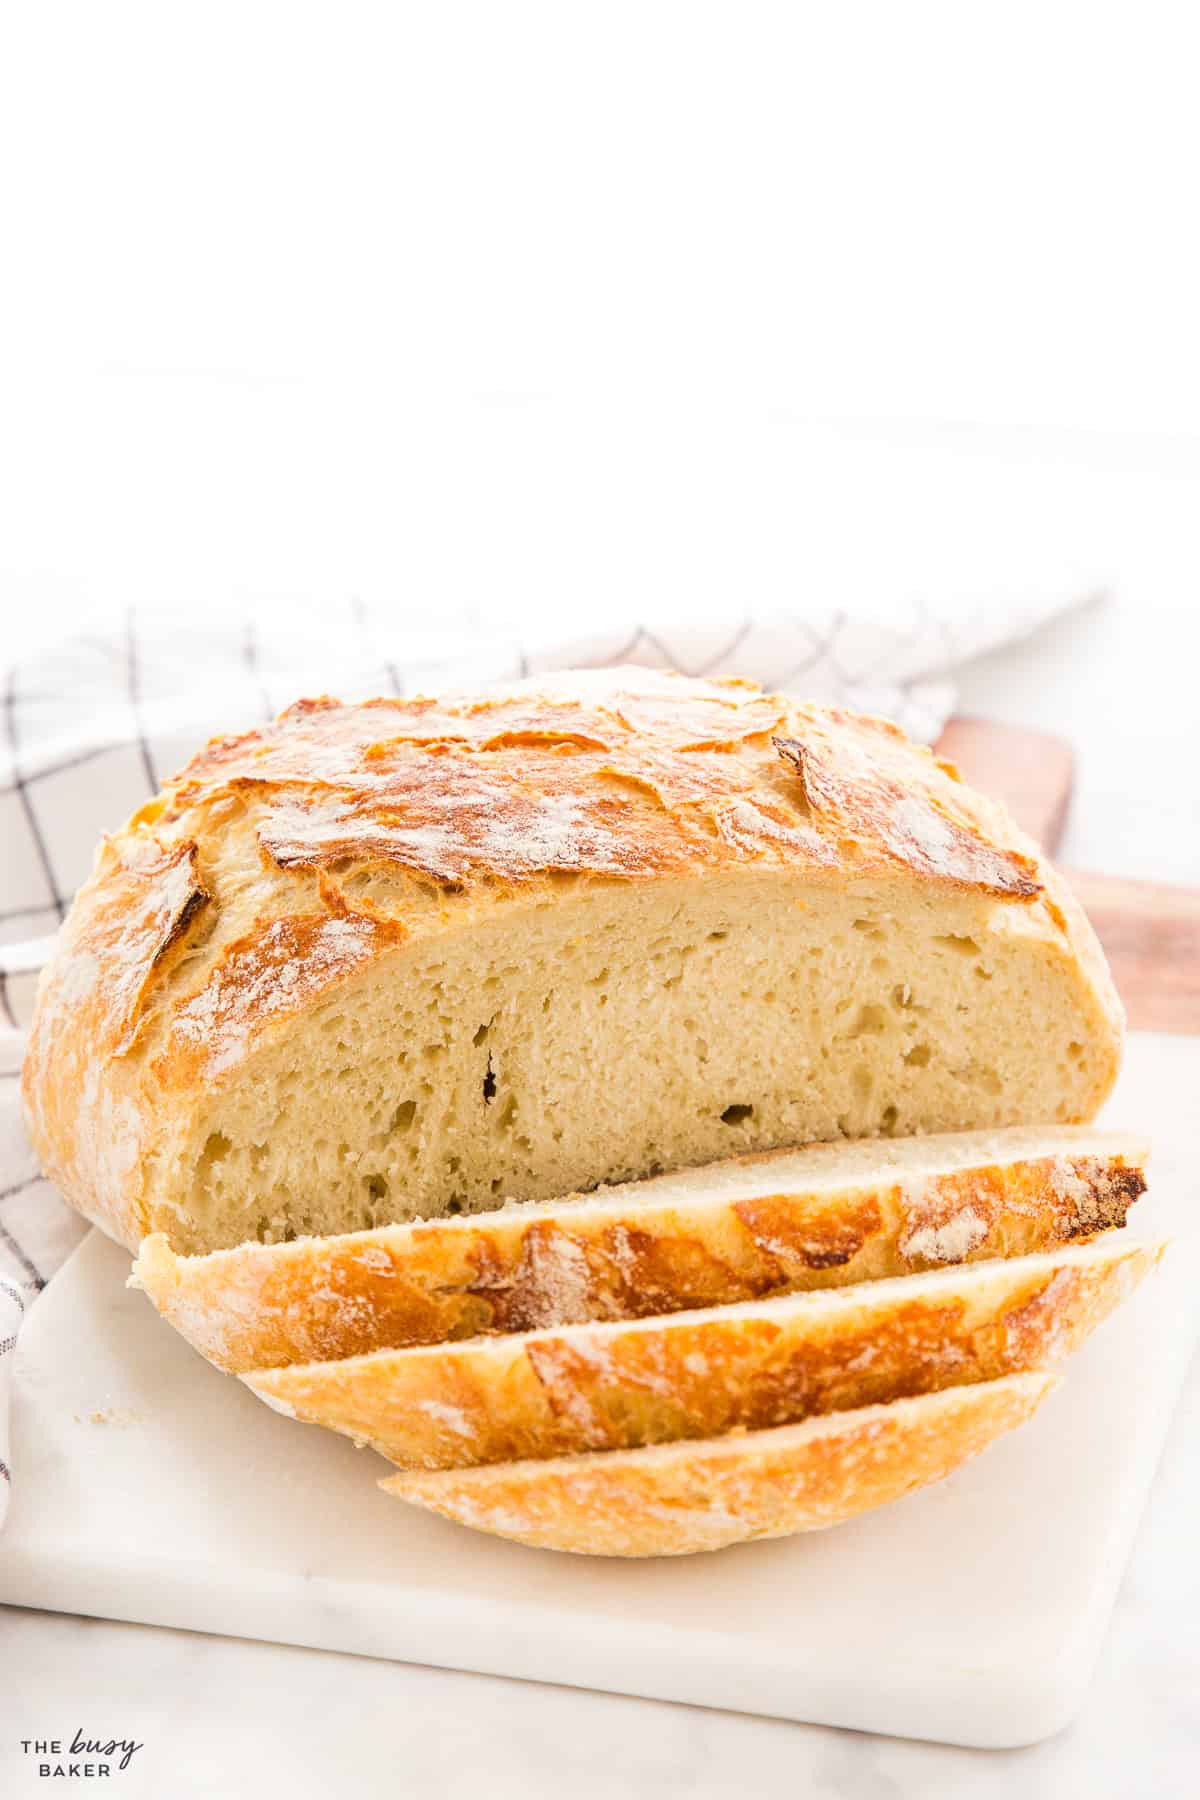
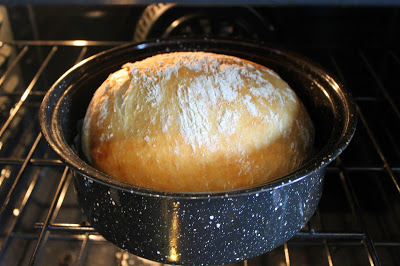
After 30 minutes have passed, remove the lid from the pot and continue baking for another 15 minutes. After the 15 minutes have passed, remove the pot with bread from the oven and place it on a wire rack to cool. You’ll probably hear it crackling as it cools – this is normal. - Cool & enjoy
If you can, resist the urge to cut into the bread until it has pretty much cooled completely. The bread continues to bake on the inside even after it has been removed from the oven and cutting it too early could result in the inside becoming gummy or rubbery.
Can I replace the instant yeast with active dry yeast?
Yes, you can use active dry yeast, you just need to dissolve it in the water and let it sit for 5-10 minutes before adding to the flour.
Is a dutch oven necessary?
Any oven safe, heavy bottomed pot with a tight-fitting lid would work.
Can I shorten the raise time?
If you’d like to make a quick rise version of this bread, please click here for our Quick No Knead Bread Recipe.
Why is my bread gummy on the inside?
Make sure your bread is fully baked and don’t slice it too early as that might cause the crumb to get destroyed. If in doubt, bake it for 5-10 minutes longer next time.
What if I don’t have a dutch oven or heavy bottomed pot?
You can use any covered pot that’s oven-safe for this recipe. We’ve even had great results using a small round roasting pan with a lid!
Can I put this dough in the fridge before baking?
Yes, after 8-10 hours of room temperature raise, you could refrigerate it for up to 24 hours to make sure your baking fits your schedule. The flavours will actually deepen during the cold fermentation.
We hope you love this easy artisan bread recipe as much as we do! Let us know in the comments below, what would YOU serve with this easy homemade crusty bread? We’d love to know!

More Bread Recipes You’ll LOVE
Stay tuned for this delicious recipe video, coming soon! Until then, check out our YouTube Channel for more recipe videos!
If you made this, share a photo!
Are you trying this recipe? Use the comment form below to share your take; now with support for image uploads and comment voting!
Easy No Knead Artisan Bread

Recipe: Equipment
Recipe: Ingredients
- 3 1/4 cups all purpose flour
- 1/2 teaspoon instant yeast
- 2 teaspoons sea salt
- 1 1/2 cups water at room temperature
Recipe: Instructions
- Start with a large bowl and a wooden spoon, and add your flour to the bowl. Measure the yeast and add it to one side of the bowl. Measure the salt and add it to the other side.
- Using a wooden spoon, stir the yeast into the flour on its side of the bowl first and then stir the salt into the flour on its side of the bowl. This will prevent the salt mixing directly with the yeast. Give the whole mixture a few good stirs to make sure everything is combined.
- Once the dry ingredients are combined, measure the water. Make sure the water is at room temperature; water that is too warm or too cold can kill the yeast and prevent the bread from rising at all. Pour the water in and stir with a wooden spoon. The dough will be rough and a bit sticky, but that’s normal.
- Stir until all the flour is combined. This is not normal bread dough (there’s no kneading involved in this recipe), so you don’t need to be too concerned about the appearance of the dough at this point. Just make sure the ingredients are combined well.

- Cover the bowl with plastic wrap. It’s a good idea to ensure there’s adequate space left in the bowl for the dough to at least double in size. Place the bowl in a warm, draft-free place and let it rise for 12-18 hours.

- After the dough has risen for 12-18 hours, preheat oven to 450℉ (230℃). Place your Dutch oven with the lid on in the cold oven and let it heat up with the oven.
- Place a piece of parchment paper on the counter and dust it with flour. Rub flour on your hands and scrape the dough away from the sides of the bowl, gathering it in your hands as best you can (it may feel kind of fluid and not at all like regular bread dough) and forming it into a circular loaf on the parchment paper. Don’t worry if it still looks a little rough in places. This lends to the rustic look of this loaf.

- Once you have it shaped, the dough needs to undergo a second rise (much shorter than the first). The goal is to handle the dough as little as possible at this stage because any amount of tugging at the dough can cause it to deflate after it has undergone its second rise. The next few steps will help prevent this. But don't worry if it deflates a bit. This bread dough is pretty forgiving.
- Sprinkle flour over the top of the loaf and loosely cover it with plastic wrap to prevent a skin from forming over the dough. The flour also prevents the plastic wrap from sticking to the dough so when you take it off at the end of the rise, it doesn’t disturb the dough and wreck the rustic shape you’ve created. Let the dough rise for about 45 minutes. Your oven will also be preheating during this time (and so will your pot).
- Once 45 minutes have passed remove the plastic wrap from the dough and trim the parchment paper into a circle closely around the dough. If it doesn’t look like the dough has risen that much, don’t worry about it. The loaf will puff up a bit when it hits the heat of the oven.
- Remove the preheated pot from the oven and transfer the dough into the pot as carefully as possible by handling only the parchment paper. Place the lid on the pot and return it to the oven for 30 minutes. Don’t open the oven during this time, and certainly don’t take the lid off the pot; the crispness of the crust develops because of the steam that builds up in the pot during this 30 minutes.
- After 30 minutes have passed, remove the lid from the pot and continue baking for another 15 minutes. After the 15 minutes have passed, remove the pot with bread from the oven and place it on a wire rack to cool. You’ll probably hear it crackling as it cools – this is normal.
- If you can, resist the urge to cut into the bread until it has pretty much cooled completely. The bread continues to bake on the inside even after it has been removed from the oven and cutting it too early could result in the inside becoming gummy or rubbery.
Recipe: Notes
Quick rise method:
If you’d like to make a quick rise version of this bread, please click here for my Quick No Knead Bread Recipe.Storage & Freezing:
Store at room temperature for 3-5 days in a paper bag or loosely wrapped in paper or kitchen towel in an airtight container. To freeze, let the bread cool completely. Wrap tightly in plastic wrap or place it in a freezer bag. Freeze for up to 3 months. For best results, we suggest you thaw the bread at room temperature, still wrapped, and refresh in a 350°F (175°C) oven for 10–15 minutes to restore crispness. We love slicing it before freezing so we can toast slices straight from the freezer.Recipe: Nutrition
Notice: Nutrition is auto-calculated, using Spoonacular, for your convenience. Where relevant, we recommend using your own nutrition calculations.

EASY NO-FAIL HOMEMADE BREAD RECIPES AND BAKING TIPS
Get my easy no-fail bread baking e-cookbook!
I have made bread in my LeCreuset before but I still can't get the crust crispy enough. I want to try this recipe and use my cast iron because the crust is my favorite part!!!
Cast iron works perfectly. This has become my go to recipe for bread. I leave the covered container I mixed it in in the fridge so each load is now developing the sourdough flavor that I prefer.
Hope it turned out good!
I have the first rise going at the moment….I notice that you don’t slash your loaf like other artisan breads. It won’t split?? Hoping for a response today before I get home to bake it.
Sometimes it does split, but it adds to the rustic nature of this bread 🙂
Now that is a gorgeous loaf of bread! This would be perfect as part of a Thanksgiving spread!
Thanks!
That is such a pretty loaf of bread! One of these days I'll have to try my hand at bread baking!
Thank you! Hope you enjoy it!
What a beautiful loaf of bread. I can only imagine how wonderful it smelled while baking.
Thanks!😊
I can't turn down a piece of crusty bread! You make this one look so easy!
Thank you!
Sounds amazing! My family would love this!
Thanks! Hope you enjoy it!
What stunning loaf of break! I love fresh bread, we could live on it at our house. And one that doesn't take a ton of work is perfect!
Thanks!😊
Looks amazing! Nothing better than fresh bread!
Thanks!
hi Chrissie. I baked this bread and it turned out exactly as advertised, great one. not kneading: love it.
So glad you enjoy it!
Fantastic recipe for making weekly bread. I bake it in my cast iron Dutch oven and it comes out perfect every time. You are right though. It's hard to wait until it is completely cooled to cut into it. It's just like a bakery load.
Do you leave the parchment paper on the bottom of the loaf when you are baking it?
Yes, it’s best if you do, but it’s possible without too 🙂
Can you use Gluten Free flour? Is there something I could mix with it to produce such a beautiful loaf? Guar gum, xanthan gum or other? Thank you for your kind attention ~ I love your recipes !!
I’m sorry, I’ve never made this with gluten-free flour so I can’t comment on how that would work!
Have you tried making Soft Pretzels with this dough? I would love to try but hoped you had a recipe!!
This dough wouldn’t be great for soft pretzels because it’s a hearty dough. I’m working on a soft pretzel recipe, but it’s not ready to share just yet!
I Have made this recipe many time and it has come out perfectly baked and crusty A great easy recipe..
So glad you liked it! 🙂
This recipe works exactly as you described. I, too, bake mine in a cast iron dutch oven and it comes out perfect every time. It has become a favorite weekly favorite of my boss and the(always hungry) young people who live next door. Thanks for sharing it with us!
Good for you for feeding your neighbours 😉 So glad you like the recipe! Thanks for taking the time to comment! 🙂
Hi Chrissie,
This bread looks so delish and I would love to try the recipe however I do not own a cast iron dutch oven.
What else would work to make this type of bread recipe? FYI I own anodized pots. Do you think this would work?
Looking forward for your reply, Thanks
Any type of oven-safe pot with a lid will work for this recipe. Cast iron dutch oven offer the best results, but they’re not necessary. Give it a try with any covered oven-safe pot you have 🙂
So I read on your other bread recipe several of the comments it’s the bread recipe for the cranberry walnut bread… And I did not have the instant yeast but had gotten the active dry yeast. I know in one of the comments you said that was fine but I didn’t know then if I should have put more in? I put this together last night and after now almost 9 hours it looks exactly the same as it did last night. I just bought the yeast about one day ago so there’s no way it’s old and less it was sitting in the store old but the date on it does not show expired at all. And I Checked the temperature of my water and it was just around 80° when I poured it in. And something else I had read somewhere between 70 and 85° would be considered room temperature so I assumed that that would be OK… I was planning to let it sit for many more hours today but I’m not feeling very hopeful that it is going to rise… Any input? I really hope it does it looks delicious!
So my bread definitely did not rise in the nearly 16 hours that I left it to rise. However I went ahead and did the second step and then baked it in the old black and white speckled pan that I had. Then left it to cool for several hours. I just toasted a piece and it was amazing! Thank you so much for this recipe I plan on making it many more times!!
Sorry one more question… Any idea how long this keeps even in the refrigerator? I believe you said it was best to not freeze it is that correct?
You mentioned that you very much liked the results from your round roasting pan. I have one of those. Do you have a pic you could post of a loaf baked that way?
Unfortunately I don’t have a photo, but the appearance was almost exactly the same 🙂
With everyone, myself included, staying home because of COVID-19 I started exploring recipes for no knead bread. I picked this recipe and have now made it 3 times with great results. I love the texture, chewiness, flavor and how beautiful and rustic the bread looks. And especially how easily it comes together. The change I’ve made is 1) I don’t cut the parchment paper. Once the dough has sat on the parchment the allotted time, I take pot out of oven , take top off and simply lift the whole thing up by the edges of parchment paper and place it in cast iron pot. Put lid on with parchment corners sticking out and in oven it goes. 2) I make the dough in a large glass bowl and found that I need to add extra water a few tablespoons at a time to get a wetter dough. Then put plastic wrap over top of bowl and put it in my cold oven to rise. Since I live in Colorado Springs and it’s winter time my house is colder and this is the best place to let the dough do it’s thing. I let it sit in the oven up to 24 hours and find I have a beautiful airy dough. Love it. Thank you!!
Glad to hear you liked the recipe so much! And I’m happy you were able to tweak it to your needs.😊
Made this yesterday and it was delicious! My Dutch oven is rated for 400 degrees. Baked for 40 mins covered and 17 uncovered. Delicious!! Definitely will make again and again. Thanks!!
You’re welcome Shannon! Thanks for the feedback!!
I’d really like to try this. What size Dutch oven do you recommend? 5.5 Qt or 7 Qt?
I have a 7.5 qt dutch oven that serves me very well.
I really thought I messed this up, then I tasted it. My Dutch oven is large, so my bread did not get as high. The taste is incredible! I let it rise 20 hours before baking, mostly because I didn’t want to get up early! I have a batch of plain dough on the rise now. I can’t wait to taste it! Thanks for the EASY recipe. It will become a staple at my house.
Homemade is so much better!! 🙂 Thanks Brenda!
I love all your artisan breads. Everyone of them are absolutely wonderful. Favorite is the cranberry, honey. I use pecans as I really do not like walnuts. But I cannot find anywhere a rye artisan bread from you. If you have please share.
I’m so happy you enjoyed them! Thank you for taking the time to leave your feedback! Sadly, I do not have a Rye artisan bread recipe yet, but I will add it to the list so me and the team can start working on one soon!
Could you please explain the reason for the long rise? Does it give the bread a sourdough flavor?
The long raise substitutes the kneading.
I can’t wait to make this no knead bread. I have a 2 QT Anchor Hocking glass casserole dish, will that be big enough to accommodate this recipe?